1. Introduction: A Rustic No Knead Rosemary Garlic Bread Worth Falling in Love With
There is something magical about homemade bread—the aroma that fills your kitchen, the golden crust that cracks gently under your fingertips, and the soft, flavorful crumb that makes every bite feel like comfort.
But not everyone has the time (or desire!) to knead dough for long minutes, monitor gluten development, or follow complex baking techniques. That’s where this Rustic No Knead Rosemary Garlic Bread steps in as the perfect choice for beginners, seasoned bakers, and anyone who wants artisan-quality bread without the effort.
What makes this bread especially irresistible is the blend of roasted garlic, olive oil, and a bubbly sourdough starter, all working together to create a loaf bursting with aroma and flavor. The simplicity of the method paired with the depth of taste makes this recipe a true keeper for every home baker.
2. Why This Recipe Works: The Science and Flavor Behind Perfection
The secret to this loaf lies in the no-knead method and slow fermentation. Rather than kneading the dough to develop gluten, time does the work. An 8–10-hour rise allows the sourdough starter to build structure naturally, producing a soft, airy, open crumb.
The roasted garlic melts seamlessly into the dough, infusing it with rich, mellow flavor instead of overwhelming sharpness. Olive oil adds softness and moisture, while the Dutch oven traps steam to ensure that gorgeous, crispy, artisan crust.
Each ingredient has a purpose, and together they create a bread that tastes far more complex than its simple technique suggests.
3. What You’ll Need For This Recipe: Ingredient Breakdown
Before diving into the recipe, here’s a closer look at the ingredients and their roles:
Sourdough starter (100g) – Adds natural rise, tanginess, and signature artisan texture.
All-purpose flour (400g) – Gives structure while keeping the crumb tender.
Warm water (280ml) – Hydrates flour and supports fermentation.
Salt (8g) – Balances flavor and strengthens the dough.
Olive oil (2 tbsp) – Adds richness and helps create a soft crumb.
Garlic (6 large cloves) – Provides bold or mild garlic notes depending on preparation.
Butter (2 tbsp) – For brushing the crust with garlic butter at the end.
Fresh parsley (optional) – Adds a burst of color and freshness.
Parmesan cheese (optional) – Enhances the savory aroma and flavor.
These everyday pantry staples transform into a beautiful rustic loaf with minimal effort.
4. Preparing the Garlic: Building Flavor From the Start
Garlic is the superstar of this recipe, and how you prepare it changes the final flavor dramatically.
You can use minced raw garlic for a bold punch, but roasting the garlic gives your bread a sweet, caramelized, mellow taste that blends beautifully into the dough.
Roasting takes only 20 minutes at 180°C. Wrapped in foil with a little oil, the cloves soften into golden, buttery garlic that you can mash smoothly into a paste. This paste ensures the garlic spreads evenly through the dough without creating sharp raw bits.
5. Mixing the Dough: The Effortless No-Knead Method
With your garlic ready, all that’s left is to combine your ingredients—no kneading required.
Simply mix flour and salt, then add the sourdough starter and warm water. The dough will look shaggy and sticky, and that’s perfect. Add the mashed garlic and olive oil, mix gently, and make sure there are no dry patches.
No kneading keeps this recipe simple, and time takes care of developing strength and structure.
6. Bulk Fermentation: Letting Time Create Magic
Cover the bowl and leave it at room temperature for 8 to 10 hours. This is where the flavor and texture transform.
The sourdough starter will create bubbles, expand the dough, and build structure without manual effort.
Depending on your kitchen temperature, this step might take slightly more or less time. When the dough looks airy, jiggly, and puffy, it’s ready for shaping.
7. Shaping the Dough: Creating Structure With Gentle Hands
Turn the dough onto a lightly floured surface and fold the edges inward to create a smooth round or oval loaf. Be gentle—this dough is full of precious air pockets!
Shaping builds surface tension, helping the loaf rise upward instead of spreading out during baking. You can even tuck a little extra roasted garlic inside for extra flavor.
Place the shaped dough onto parchment paper or into a floured proofing basket for the second rise.
8. Second Rise: Final Proofing Before Baking
Let the dough rest for 1 to 2 hours. It doesn’t need to double; it simply needs to puff slightly and relax. During this time, preheat your oven to 230°C with a Dutch oven inside. This creates the perfect steaming environment for baking artisan bread.
9. Baking the Bread: Achieving the Artisan Crust
Once the oven is hot, carefully place the dough inside the Dutch oven using the parchment paper as a sling. Score the top to help the loaf expand beautifully.
Bake 30 minutes covered, then remove the lid and bake 10–15 minutes more until the crust is golden and crisp.
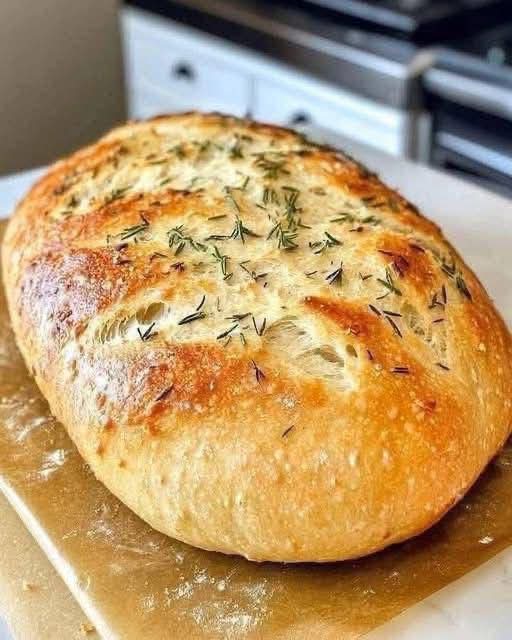
The Dutch oven traps steam, giving you a bakery-quality crust every time.
10. Garlic Butter Finish: The Secret Touch of Flavor
While the bread bakes, melt two tablespoons of butter with a clove of minced garlic.
As soon as the bread comes out of the oven, brush the crust with the fragrant garlic butter. The heat allows it to soak in instantly, enhancing every bite with richer flavor. Add parsley or Parmesan for even more character.
11. Cooling Your Bread: The Final Step You Should Not Skip
It may be tempting to slice into your loaf right away—but patience is key. Cooling for at least 30 minutes allows the crumb to set, prevents gumminess, and ensures perfect slices.
This resting period finalizes the bread’s texture and makes each bite more satisfying.
12. Tips + Tricks & More For Recipe Success
Here’s how to achieve the best loaf every time:
Use an active, bubbly sourdough starter for maximum rise.
Roast your garlic for sweeter flavor and smoother mixing.
Don’t rush fermentation. Time builds flavor and airiness.
Handle the dough gently during shaping to keep the air inside.
Use a Dutch oven for the most beautiful crust.
Brush with garlic butter immediately so it soaks into the hot crust.
Let the bread cool fully before slicing for perfect texture.
For stronger garlic flavor, add a second layer of minced garlic during shaping.
For milder garlic flavor, reduce cloves or roast them longer.
Add herbs like rosemary or thyme if you enjoy herbal aroma.
Sprinkle cheese over the crust for extra savory depth.
These small choices can elevate your bread from delicious to unforgettable.
13. How To Serve Your Rustic No Knead Bread
This bread is wonderfully versatile. Serve it:
Warm with butter
With olive oil and balsamic vinegar
Alongside hearty soups
With pasta dishes
As the base for sandwiches
Toasted with cheese or herbs
As part of a rustic charcuterie board
The garlic and sourdough notes pair beautifully with many cuisines.
14. Serving Suggestions: Perfect Pairings for Every Occasion
Here are some delicious ways to enjoy your loaf:
Classic rosemary butter spread
Creamy tomato basil soup
Roasted vegetable platters
Italian pasta dinners
Grilled meats or BBQ dishes
Breakfast avocado toast
Bruschetta with tomatoes and basil
This bread enhances both everyday meals and special gatherings.
15. Time Required For This Recipe
Here is the approximate timeline:
Garlic preparation: 5–20 minutes
Mixing the dough: 5 minutes
Bulk fermentation: 8–10 hours
Shaping: 5 minutes
Second rise: 1–2 hours
Baking: 40–45 minutes
Cooling: 30 minutes
Total time: About 10–14 hours (mostly resting time)
Hands-on time: Less than 20 minutes
16. Final Thoughts: A Recipe You’ll Bake Again and Again
This Rustic No Knead Rosemary Garlic Bread is the kind of recipe that turns simple ingredients into something extraordinary. With minimal hands-on time and maximum flavor payoff, it’s ideal for beginners and experts alike. The blend of roasted garlic, sourdough tang, and soft-yet-crispy artisan texture makes this loaf unforgettable.
Whether you’re baking for family dinners, special gatherings, or your weekly bread routine, this recipe will quickly become a favorite. Every slice offers warmth, comfort, and that homemade magic no store-bought loaf can match.