Decadent Salted Caramel Bars: The Ultimate Sweet and Salty Dessert
Salted caramel desserts have become a beloved classic in bakeries and kitchens around the world. The combination of rich, buttery sweetness with a subtle touch of salt creates a perfectly balanced flavor that feels both indulgent and comforting.
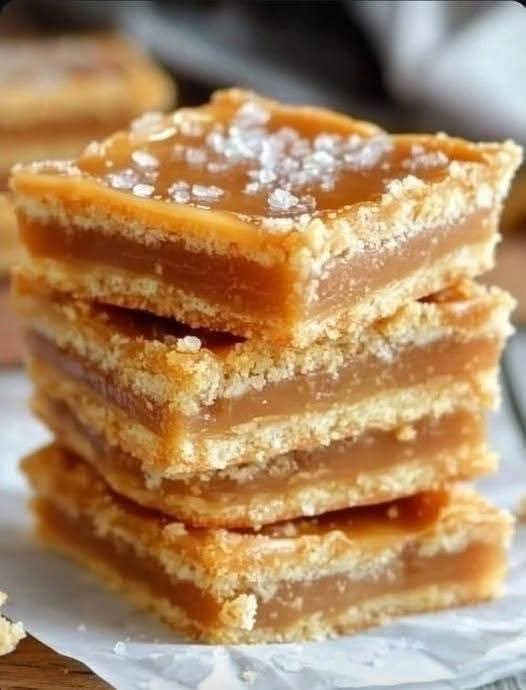
Among all salted caramel treats, Decadent Salted Caramel Bars stand out as a truly irresistible dessert.
These bars feature three delightful layers: a buttery shortbread crust, a smooth and creamy salted caramel filling, and a crumbly golden topping. The texture contrast between the tender shortbread and the chewy caramel creates a dessert that feels luxurious with every bite.
Whether you’re preparing dessert for a family gathering, holiday celebration, or simply craving something sweet, these salted caramel bars are guaranteed to impress.
They’re easy to make, require simple ingredients, and deliver bakery-quality results right from your kitchen.
Why This Recipe Works
This recipe works beautifully because each layer is designed to complement the others. The buttery shortbread base provides a sturdy yet tender foundation for the rich caramel filling.
Using cold butter helps create a flaky, melt-in-your-mouth texture that balances the sweetness of the caramel.
Another reason this recipe succeeds is the method used to melt the caramel candies with heavy cream. This technique produces a smooth, glossy caramel sauce without the need for complicated candy-making steps.
Finally, the crumb topping adds both texture and flavor. As the bars bake, the topping becomes lightly golden and slightly crisp, creating the perfect contrast to the soft caramel layer beneath.
Together, these elements create a dessert that is sweet, buttery, chewy, and slightly salty—a combination that keeps people coming back for another piece.
The Magic of Salted Caramel Flavor
Salted caramel has become one of the most popular dessert flavors for a good reason. The salt enhances the sweetness of the caramel and adds complexity to the flavor profile.
Without salt, caramel can sometimes taste overwhelmingly sweet. But when flaky sea salt is introduced, it balances the sugar and highlights the buttery notes.
This flavor combination stimulates multiple taste receptors at once—sweet, salty, rich, and slightly toasted—making every bite incredibly satisfying.
A Dessert Perfect for Any Occasion
One of the best things about these salted caramel bars is their versatility. They can be served for casual gatherings, holiday desserts, birthday celebrations, or even packaged as thoughtful homemade gifts.
Because the bars are cut into squares, they are easy to transport and share. This makes them perfect for bake sales, potlucks, or family picnics.
They also pair beautifully with coffee, tea, or a glass of milk, making them ideal for an afternoon treat or after-dinner dessert.
What You’ll Need For This Recipe
To make these delicious salted caramel bars, you will need simple pantry ingredients that work together to create the rich flavor and texture.
For the Shortbread Crust and Topping:
All-purpose flour
Salted butter (cold and cubed)
Powdered sugar
Granulated sugar
Pure vanilla extract
For the Salted Caramel Filling:
Soft caramel candies
Heavy cream
Flaky sea salt
Pure vanilla extract
These ingredients combine to produce a dessert that tastes complex yet requires minimal effort.
Essential Kitchen Tools
Having the right tools makes preparing this recipe easier and more enjoyable. Fortunately, you only need a few basic kitchen items.
You’ll need a 9×13-inch baking dish, parchment paper, a large mixing bowl, a whisk, and a microwave-safe bowl for melting the caramel.
A pastry blender or your fingertips will help incorporate the butter into the flour mixture to create the crumbly shortbread texture.
A spatula is also helpful for spreading the caramel evenly before baking.
How To Make This Recipe
Start by preheating your oven to 350°F (175°C) and preparing your baking dish with parchment paper. The parchment overhang will make removing the bars much easier later.
In a large bowl, whisk together the flour, powdered sugar, and granulated sugar. Add the vanilla extract to bring warmth and depth to the flavor.
Next, incorporate the cold cubed butter into the dry ingredients using a pastry blender or your hands. Continue working the mixture until it forms coarse crumbs with small butter pieces still visible.
Press half of this mixture into the bottom of the prepared baking dish to create the crust.
Making the Creamy Salted Caramel Filling
Place the unwrapped caramel candies and heavy cream in a microwave-safe bowl. Heat the mixture in 30-second intervals, stirring well between each round.
Continue microwaving until the caramel becomes completely melted and smooth. This step is essential for achieving a silky filling.
Once the caramel is melted, stir in the flaky sea salt and vanilla extract. The aroma at this stage is absolutely irresistible.
Assembling the Layers
Pour the warm caramel mixture over the prepared shortbread crust. Use a spatula to spread the caramel evenly across the surface so every bite has the perfect amount of filling.
Next, sprinkle the remaining crumb mixture over the caramel layer. Do not press it down; allowing it to sit loosely creates a light and crumbly topping during baking.
This layered structure ensures every bite contains buttery shortbread, gooey caramel, and crispy topping.
Baking the Salted Caramel Bars
Place the baking dish in the preheated oven and bake for 25–30 minutes.
During baking, the crumb topping will turn a beautiful golden color while the caramel gently bubbles around the edges.
This bubbling indicates that the caramel is heating evenly and bonding with the crust layers.
Once the bars are golden brown, remove them from the oven and allow them to cool on a wire rack.
Cooling and Setting the Bars
Cooling is one of the most important steps in this recipe.
After baking, allow the bars to cool at room temperature for about 30 minutes. This initial cooling helps the caramel begin to firm up.
Next, transfer the dish to the refrigerator and chill for at least two hours. This step ensures the caramel becomes fully set and makes cutting clean squares much easier.
Once chilled, lift the bars out using the parchment paper and cut them into neat squares.
Tips + Tricks & More For Recipe Success
For the best results, always use cold butter when preparing the shortbread mixture. Cold butter creates pockets of steam while baking, producing a tender and flaky texture.
Another helpful tip is to line your pan with parchment paper. This allows you to remove the bars easily without breaking the caramel layer.
Be careful not to overbake the bars. Baking them just until golden brown keeps the crust tender and prevents the caramel from becoming too firm.
Finally, patience is key. Allowing the bars to chill completely will give you perfect, bakery-style squares.
How to Serve Salted Caramel Bars
Salted caramel bars are best served slightly softened at room temperature. After removing them from the refrigerator, allow them to sit for 5–10 minutes before serving.
This brief resting time softens the caramel slightly and enhances the flavor of the butter and vanilla.
You can also sprinkle a little extra flaky sea salt on top for a gourmet finishing touch.
These bars look beautiful when arranged on a dessert plate or serving tray.
Serving Suggestions
There are many delicious ways to serve these salted caramel bars.
They pair wonderfully with fresh coffee or espresso, making them perfect for afternoon dessert or weekend brunch.
For a more indulgent presentation, serve the bars with a scoop of vanilla ice cream. The warm caramel flavor combined with cold ice cream creates an unforgettable dessert.
You can also drizzle melted chocolate over the bars or add chopped nuts for additional texture and flavor.
These simple additions can elevate the dessert even further.
Preparation Time, Baking Time, and Total Time
Understanding the time needed helps you plan your baking schedule.
Preparation Time: approximately 20 minutes
Baking Time: 25–30 minutes
Cooling Time: 30 minutes at room temperature
Chilling Time: at least 2 hours
Total Time: about 3 hours from start to finish.
While the chilling time may seem long, most of it is hands-off, allowing you to prepare other dishes or simply relax while the bars set.