Title 1: 3 Apples, 3 Eggs, a Glass of Milk: The Magical Dessert That Melts in Your Mouth
If there’s one dessert that feels like a warm hug, a whisper of nostalgia from a grandmother’s kitchen, this is it. “3 Apples, 3 Eggs, a Glass of Milk and It Melts in the Mouth!” is more than a recipe; it’s a promise.
A promise of astounding simplicity yielding a result of pure, unadulterated comfort. Imagine the sweet, spiced aroma of baking apples wafting through your home, a prelude to a cake so tender, so delicately moist, that it truly lives up to its name, dissolving on the tongue in a symphony of gentle flavors.
This isn’t a complex, fussy patisserie project; it is the essence of home baking, a testament to the fact that the most profound joys often come from the humblest of ingredients.
It’s the cake you whip up for an unexpected guest, the treat you bake to make a Tuesday feel special, and the dessert that will have everyone at the table asking for the secret before they’ve even finished their first, magical slice.
Title 2: The Alchemy of Simplicity: Why This Recipe Works So Beautifully
At first glance, the ingredient list seems almost too basic to produce something extraordinary. But therein lies its genius. This recipe works through a perfect, harmonious balance of moisture, structure, and flavor.
Unlike dense, heavy pound cakes or overly sweet confections, this cake achieves its “melt-in-the-mouth” texture by creating a light, almost pudding-like crumb that is simultaneously sturdy enough to hold the generous amount of fruit.
The apples are the undisputed star, providing natural sweetness and pockets of soft, jammy fruit, while the simple batter acts as a tender, vanilla-kissed canvas.
The precise ratio of eggs to milk to flour creates a delicate matrix that steams and puffs ever so slightly in the oven, resulting in a cake that is cloud-like yet satisfying. It’s a masterpiece of culinary equilibrium, where every component has a purpose, and nothing is out of place.
Title 3: A Pantry Staple Dream: What You’ll Need For This Recipe
The beauty of this cake is that it requires no special trip to a gourmet market. You likely have everything you need already waiting in your kitchen. The short list of ingredients is key to its pure, uncluttered flavor profile. Here’s your shopping list, which is really just a quick pantry audit.
The Ingredients:
· 3 Medium Apples: The variety you choose is crucial for the best result. Opt for firm, slightly tart apples that hold their shape during baking. Granny Smith provides a lovely tang that contrasts beautifully with the sweet batter, Braeburn offers a balanced sweet-tart flavor, and Honeycrisp gives a robust sweetness and firm texture.
· 3 Large Eggs: Ensure they are at room temperature. This is not a trivial detail! Room-temperature eggs incorporate more air into the batter, leading to a lighter, more uniform crumb.
· 1 Glass of Whole Milk (250 ml): The fat in whole milk contributes to the rich, tender texture of the cake. For a slightly denser but still delicious version, you can use 2% milk.
· 250 ml (about 1 cup + 2 tbsp) of All-Purpose Flour: Using a simple glass to measure the flour is part of the recipe’s charm, but for precision, a standard 250ml glass yields this amount. For a lighter texture, you can use Italian “00” flour if you have it.
· 150 grams (¾ cup) of Granulated Sugar: This provides the baseline sweetness. You can adjust this slightly based on the natural sweetness of your apples.
· 1 sachet (about 2 ½ tsp) of Baking Powder: This is the leavening agent that gives the cake its gentle rise and airy structure.
· 1 teaspoon of Pure Vanilla Extract: The supporting actor that enhances all the other flavors.
· 1 teaspoon of Ground Cinnamon (Optional but Recommended): Cinnamon and apples are a match made in heaven, adding warmth and depth.
· A Pinch of Fine Sea Salt: Salt is essential for balancing the sweetness and making the flavors pop.
· Unsalted Butter or Neutral Oil: For greasing the pan.
· Icing Sugar (for dusting): For a beautiful, snowy, and professional-looking finish.
The Essential Equipment:
· Two Mixing Bowls: One for dry ingredients, one for wet.
· A Whisk: An electric hand mixer can be used, but a simple whisk is perfectly adequate and keeps with the rustic spirit of the recipe.
· A Rubber Spatula: For folding the batter and ensuring you get every last bit out of the bowl.
· An 8-inch or 9-inch Springform Pan: This is highly recommended. The removable sides make it incredibly easy to unmold this delicate cake without it breaking.
· Parchment Paper: To line the bottom of the pan for a guaranteed clean release.
· A Knife and Cutting Board: For prepping the apples.
· A Sieve or Fine-Mesh Strainer: For dusting the icing sugar with elegance.
Title 4: The Foundation of Flavor: Preparing Your Apples and Pan
Success in baking is often found in the preparation. Before you even think about mixing the batter, take care of these two critical steps. First, prepare your apples. Peel them, then slice them in half to remove the core.
You can then either slice them into thin, half-moon shapes about ¼-inch thick or cut them into small, bite-sized chunks. The slices will create beautiful, distinct layers within the cake, while chunks will distribute the apple flavor more evenly. As you cut them, you can toss the apple pieces with a squeeze of lemon juice to prevent browning, though it’s not strictly necessary as they will be baked shortly.
Next, prepare your pan. Take your springform pan and grease the bottom and sides thoroughly with softened butter or a neutral-tasting oil. Place a round of parchment paper on the bottom—this is your insurance policy against sticking.
Then, give the parchment and sides a very light dusting of flour, tapping out any excess. This prepared pan is the stage upon which your culinary masterpiece will perform.
Title 5: Creating the Cloud: Mixing the Wet Ingredients
Now, we begin the alchemy. In your larger mixing bowl, crack in the three room-temperature eggs. Using your whisk or an electric mixer on medium speed, begin to beat the eggs. Now, slowly stream in the granulated sugar while continuing to whisk. Continue to whisk for a good 2-3 minutes until the mixture becomes pale yellow, thick, and forms a ribbon-like trail when you lift the whisk.
This step, called “ribboning,” is crucial as it incorporates air, which is a primary leavening agent for the cake’s light texture. Once ribboned, whisk in the room-temperature milk and the teaspoon of vanilla extract until the mixture is smooth and homogenous.
Title 6: Building the Structure: Combining the Dry Ingredients
In your second, smaller bowl, it’s time to combine the elements that will give the cake its form. Take your measured flour and add the baking powder, the cinnamon (if using), and that all-important pinch of salt. Use a whisk to sift these dry ingredients together right in the bowl.
This does two things: it aerates the flour for a lighter cake, and it ensures the baking powder and salt are evenly distributed throughout the flour, preventing any bitter pockets in the final bake.
Title 7: The Gentle Merge: Combining Wet and Dry Ingredients
This is a step where gentleness is key. You do not want to overmix and develop the gluten in the flour, which would lead to a tough, rubbery cake. Take your whisk and add about one-third of the dry ingredient mixture into the wet ingredients. Gently whisk until just combined.
Repeat with the second third, and finally the last third, mixing until you no longer see any large pockets of dry flour. A few small lumps are perfectly fine; it’s better to have a slightly lumpy batter than an overmixed one. If you’re switching to a spatula for the next step, now is the time.
Title 8: The Star of the Show: Folding in the Apples
Bring your prepared apples and your rubber spatula to the bowl. Add about two-thirds of the apple pieces to the batter. Using a gentle, folding motion—scooping from the bottom of the bowl and turning over the top—incorporate the apples.
This method preserves the air you so carefully whisked into the eggs. The remaining one-third of the apples will be used for the top, creating a beautiful, concentrated apple layer.
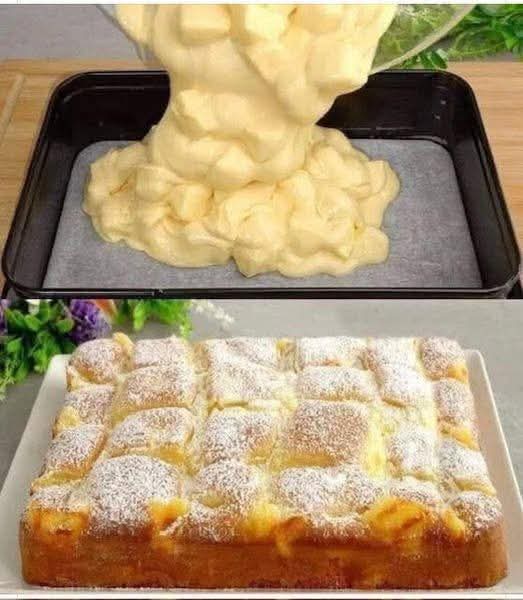
Title 9: The Final Assembly: Pouring and Topping the Batter
Pour the completed batter into your prepared springform pan. It will be a relatively thin batter, which is exactly what you want. Use your spatula to spread it into an even layer, ensuring it reaches the sides. Now, artfully arrange the remaining one-third of the apple pieces on top of the batter. You can create a simple spiral pattern from the outside in, or just scatter them evenly for a more rustic look. This top layer of apples will caramelize slightly as it bakes, creating a beautiful finish and intense apple flavor in every bite.
Title 10: The Transformation: Baking to Golden Perfection
Preheat your oven to 350°F (180°C). Place the cake on the center rack and bake for 40-50 minutes. Ovens vary, so start checking at the 40-minute mark. The cake is done when the top is a deep, golden brown, the apples on top are soft and bubbly, and a wooden skewer or toothpick inserted into the center of the cake (avoiding an apple piece) comes out clean. The cake will also have pulled away slightly from the sides of the pan. Another good test is to gently press the center; it should spring back.
Title 11: The Test of Patience: Cooling the Cake Properly
This might be the hardest step: you must let the cake cool. As it comes out of the oven, the structure is still very delicate. If you try to remove it from the pan immediately, it may collapse. Place the entire pan on a wire rack and let it cool for at least 20 minutes. Then, and only then, carefully run a knife around the inner edge of the springform pan to loosen any stuck bits. Release the clasp and remove the ring. Allow the cake to cool completely on its base before attempting to transfer it to a serving plate. This cooling period allows the steam to set the crumb, ensuring that “melt-in-your-mouth” texture.
Title 12: The Grand Finale: How to Serve Your Masterpiece
Once the cake is completely cool, it’s time for the final flourish. Use a fine-mesh sieve to dust the top generously with icing sugar. This creates a beautiful contrast with the golden-brown apples and makes the cake look professionally finished. Using a sharp knife, slice the cake into portions. Because of its tender crumb, a serrated knife used with a gentle sawing motion often works best. Serve it on its own to truly appreciate its delicate texture, or move on to the wonderful serving suggestions below.
Title 13: Elevating the Experience: Serving Suggestions & Pairings
While this cake is sublime on its own, it also serves as a fantastic canvas for a variety of accompaniments.
· A La Mode Excellence: Serve a warm slice topped with a scoop of high-quality vanilla bean ice cream. The contrast of warm cake and cold, creamy ice cream is a classic for a reason.
· The Creamy Dream: A dollop of freshly whipped cream or a pour of warm custard (crème anglaise) turns this simple cake into a decadent dessert.
· A Caramel Drizzle: For the ultimate indulgence, warm up some store-bought or homemade caramel or dulce de sauce and drizzle it over the slice just before serving.
· A Morning Treat: This cake is not overly sweet, making it perfectly acceptable for a weekend breakfast or brunch alongside a cup of coffee or tea.
· An Afternoon Delight: A simple slice with a cup of Earl Grey tea or a strong espresso is the perfect way to brighten any afternoon.
Title 14: Your Path to Perfection: Tips, Tricks & More For Recipe Success
· Room Temperature is Non-Negotiable: Using cold eggs and milk straight from the fridge will cause the batter to seize and result in a denser cake. Plan ahead!
· Don’t Overmix: Once the flour is added, switch to a gentle hand. Mix until just combined. Overworking the gluten is the enemy of a tender crumb.
· The Toothpick Lie: When testing for doneness, if you hit a piece of apple, the toothpick will come out wet. Make sure you test the actual cake batter in a few spots.
· Embrace Variations: Add the zest of one lemon or orange to the wet ingredients for a bright, citrusy note. A handful of chopped walnuts or pecans folded in with the apples adds a wonderful crunch.
· Storage Instructions: Keep the cake covered at room temperature for up to 2 days. For longer storage, it can be refrigerated for up to 5 days. Let it come to room temperature or warm slightly before serving to restore its “melt-in-the-mouth” quality.
From its humble ingredients to its spectacular result, this recipe is a celebration of simple, honest baking. It proves that you don’t need complexity to create something truly magical. So, gather your three apples, three eggs, and that glass of milk, and treat yourself to a dessert that truly lives up to its enchanting name.