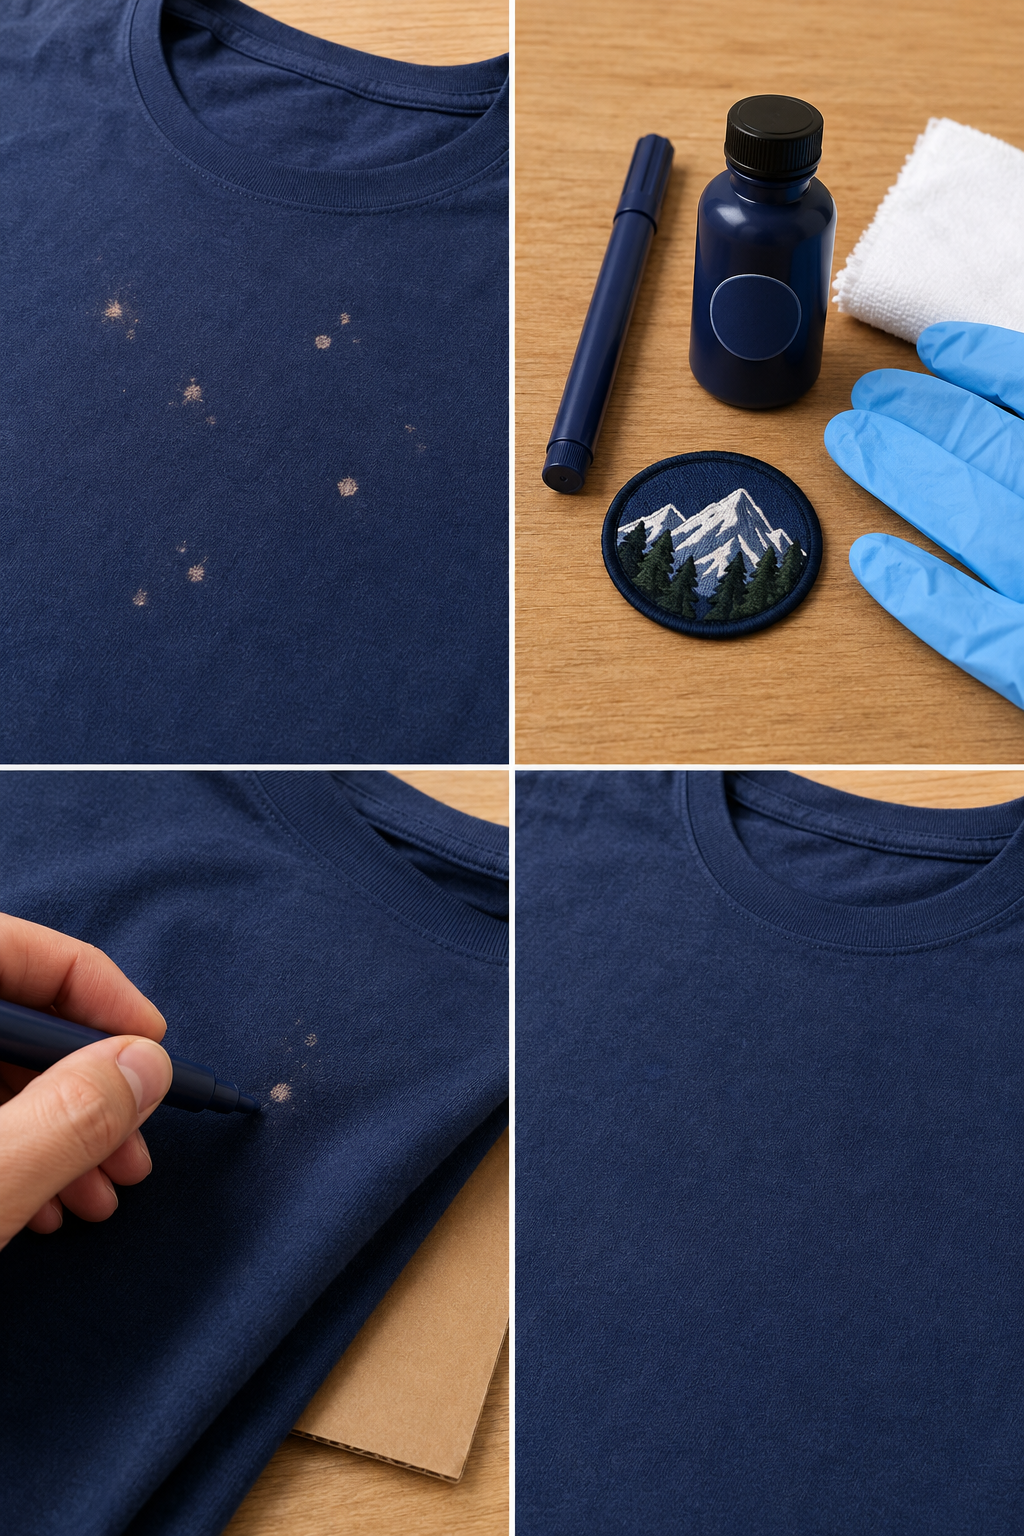
Bleach marks can make a favorite shirt, hoodie, or pair of jeans look ruined in seconds. The pale spot may appear to be a stain, but bleach damage is different from coffee, grease, or dirt: bleach chemically removes dye from the fabric.
That means the original color cannot simply be washed back into place. However, the garment may still be worth saving. Depending on the size and location of the mark, you may be able to recolor it, cover it, redye the entire garment, or turn the damaged area into an intentional design.
The best solution depends on the fabric, garment color, and extent of the damage. Here is how to assess the problem and choose a practical repair without relying on questionable chemical “hacks.”
What Bleach Does to Fabric
Most household chlorine bleach contains sodium hypochlorite. When bleach touches colored fabric, it reacts with the dye and breaks down the compounds responsible for its color.
A fresh splash may initially look wet or slightly lighter. As the reaction continues, the area may turn orange, pink, yellow, pale brown, or nearly white. The final color depends on the original dye and how long the bleach remained on the material.
Because the pigment has been removed, the pale area is not technically a removable stain. Cleaning it more aggressively will not restore the missing color and may weaken the fibers.
The realistic goal is to:
- Stop any remaining bleach from causing further damage.
- Disguise small pale spots with a fabric-safe colorant.
- Redye a larger section or the entire garment.
- Cover the damage with a patch, embroidery, or fabric paint.
- Repurpose the garment if an invisible repair is not possible.
What to Do Immediately After a Bleach Spill
Acting quickly cannot guarantee that the original color will survive, but it can limit additional damage.
Move Away From the Bleach
Take the garment away from the spill or cleaning area. If you are still using bleach, close its container and place it somewhere secure before handling the clothing.
Work in a well-ventilated space and avoid touching concentrated bleach with bare skin. Follow all safety instructions printed on the product label.
Remove the Garment Carefully
If bleach has soaked through the material, remove the garment so it is no longer in contact with your skin. Avoid touching your face or eyes while handling it.
If bleach gets into your eyes or causes skin irritation, follow the product’s first-aid directions and contact a medical professional or poison control service when appropriate.
Rinse With Plenty of Water
Hold the affected area under cool running water. Rinse both sides of the fabric thoroughly to remove as much bleach residue as possible.
Do not immediately add vinegar, ammonia, rubbing alcohol, hydrogen peroxide, or another cleaning product. The CDC advises never mixing household bleach with other cleaners or disinfectants, because some combinations can release dangerous vapors.
Wash According to the Care Label
After rinsing, wash the item separately with regular laundry detergent, following its care-label instructions. Allow it to dry before deciding how to repair the discoloration.
Drying reveals the final size and color of the mark. It also prevents you from choosing a repair color while the fabric is wet and temporarily darker.
Inspect the Damage Before Choosing a Repair
Once the garment is clean and dry, examine it in natural light.
Consider the following questions:
- Is the damage one tiny dot, several splashes, or one large patch?
- Is the fabric a solid color, print, heathered material, or denim?
- Does the care label identify it as cotton, polyester, wool, silk, or a blend?
- Is the damaged area thin, rough, or developing a hole?
- Is the mark in a noticeable location?
- Does the garment have sentimental or financial value?
If the fibers feel weak or brittle, adding color will improve only the appearance. The area may still require reinforcement with stitching or a patch.
For an expensive, delicate, vintage, or dry-clean-only garment, consult a professional cleaner or textile repair specialist before applying dye or markers.
Method 1: Use a Fabric Marker for Tiny Spots
A fabric marker is often the simplest solution for a few small bleach dots on a solid-colored garment. It adds color to the damaged section instead of attempting to remove the mark.
Choose the Closest Color
Bring the clean, dry garment with you when shopping for a marker if possible. Compare colors in natural light rather than relying only on the color printed on the package.
An exact match can be difficult, particularly with black clothing. “Black” fabric may contain blue, brown, gray, purple, or green undertones. A very dark marker can create a new spot that looks almost as obvious as the bleach mark.
When choosing between two shades, beginning with the slightly lighter one is usually easier. You can build the color gradually, but removing a color that is too dark may be difficult.
Test in a Hidden Area
Test the marker on an inside seam, hem allowance, or another concealed section. Let it dry completely because the wet color may not match its final appearance.
Confirm that the marker is designed for fabric and follow its instructions for drying, heat-setting, and laundering.
Apply the Color in Thin Layers
Place cardboard or a folded white towel behind the damaged area to prevent the color from bleeding through to another layer.
Touch the marker lightly to the center of the pale spot. Add the color in small amounts rather than drawing a heavy circle around the damage. Allow each layer to dry before deciding whether another is necessary.
For textured or heathered fabric, use tiny irregular dots instead of one solid block of color. This can help the repair blend with the surrounding material.
Method 2: Use Fabric Paint
Fabric paint can work better than a marker when the bleach damage is slightly larger or when an exact color match is impossible.
You can either imitate the original color or create a small decorative element over the mark. Simple shapes, leaves, flowers, stars, or geometric details can make the repair appear intentional.
Choose paint made specifically for textiles. Place a barrier inside the garment, test the paint on a hidden area, and follow the manufacturer’s directions. Some products must be heat-set before washing.
Fabric paint may change the texture of the material, so it is less suitable for a large area where flexibility and softness matter.
Method 3: Redye the Garment
When bleach affects a broad area, redyeing the entire garment may produce a more balanced result than attempting a spot repair.
Check the Fiber Content
Dye must be compatible with the fiber:
- Cotton, linen, and rayon generally accept many widely available fabric dyes.
- Polyester usually requires a dye formulated for synthetic fibers and may need sustained high heat.
- Blended fabrics may produce a lighter or uneven color.
- Wool and silk require products and temperatures suitable for protein fibers.
- Sewing thread, zippers, logos, and elastic may not absorb the same dye as the main fabric.
Always read both the garment’s care label and the dye manufacturer’s instructions.
Understand the Limitations
Fabric dye is often translucent rather than opaque. If the bleached section is much lighter than the surrounding material, it may absorb the new dye differently and remain somewhat visible.
Dyeing the garment a darker color can improve the chance of achieving an even appearance, but no result is guaranteed. Test a concealed area when possible.
Protect your workspace, wear appropriate gloves, and use containers and tools according to the dye label. Do not mix dye products with residual bleach or unapproved household chemicals.
Method 4: Cover the Damage
If matching the original color is unrealistic, covering the bleach mark may be the most reliable solution.
Sew-On or Iron-On Patches
Patches work especially well on denim jackets, jeans, hoodies, workwear, and children’s clothing. Select a patch that is slightly larger than the damaged area.
Check the care label before using an iron-on patch. Some synthetic fabrics can melt, shine, or distort under high heat. A sew-on patch is safer when the fabric is heat-sensitive.
If the bleached area has weakened, a patch also provides structural support that color alone cannot offer.
Embroidery
Small flowers, stars, initials, vines, or geometric shapes can hide scattered bleach dots. Multiple small marks can be connected into one planned design.
Embroidery is especially useful when the damage is located on a pocket, sleeve, collar, or chest area. Use an embroidery stabilizer if the material stretches easily.
Decorative Appliqué
An appliqué is a shaped piece of fabric sewn over the damaged section. It can provide more coverage than embroidery while still looking intentional.
Choose a washable fabric with care requirements similar to the original garment so the two materials do not shrink differently.
Method 5: Redesign or Repurpose the Garment
Some bleach damage is too extensive for a subtle repair. In that situation, redesigning the item can be more successful than trying to hide every mark.
Possible options include:
- Adding a larger fabric-paint design.
- Applying several coordinated patches.
- Cropping a damaged T-shirt or sweatshirt.
- Turning jeans into shorts if the damage is below the knee.
- Using the material for a tote bag, cleaning cloths, or craft projects.
- Adding contrasting panels or pockets.
- Creating an intentional distressed look with stitching and patches.
Avoid using additional bleach to create a matching pattern unless you are experienced and the product label specifically supports that use. More bleach can weaken the fabric, create unexpected colors, and expose you to unnecessary chemical risks.
Why the Alcohol Trick Is Not Recommended
Some online guides suggest rubbing vodka, gin, or isopropyl alcohol around the mark to move surrounding dye into the bleached area. This method is unpredictable and does not replace the color that bleach destroyed.
Alcohol may spread or lift additional dye, enlarge the discolored area, damage certain finishes, or create a visible ring. More importantly, rubbing alcohol should never come into contact with active chlorine bleach. Guidance from the University of Rochester Medical Center warns that combining bleach and rubbing alcohol can create toxic compounds.
Rinsing and washing the garment does not make the alcohol technique reliable as a color-repair method. A fabric marker, compatible dye, patch, or decorative repair offers more controlled results.
Common Mistakes to Avoid
Treating the Mark Like an Ordinary Stain
Scrubbing, stain remover, or repeated washing will not bring back missing dye. Aggressive treatment can weaken the fibers and make the pale area larger.
Mixing Cleaning Chemicals
Never combine bleach with vinegar, ammonia, alcohol, acids, or other cleaners. Follow the bleach label and use one product at a time.
If you accidentally mix cleaning chemicals and notice strong fumes, coughing, burning eyes, chest discomfort, or breathing difficulty, leave the area and move to fresh air. Seek medical assistance or contact poison control.
Skipping the Patch Test
Markers, paints, and dyes may look different after drying. Always test the product in a concealed location before treating the visible area.
Using an Ordinary Permanent Marker
A regular permanent marker may have the wrong undertone, produce a shiny patch, bleed in the wash, or fade differently from the fabric. Use a product designed and labeled for textiles whenever possible.
Expecting a Perfect Color Match
Fabric color varies with fiber type, wear, washing, and lighting. A repair can make the mark less noticeable without making it completely invisible.
How to Prevent Future Bleach Marks
Preventing bleach contact is easier than repairing damaged fabric.
- Wear old clothing or a protective apron when cleaning with bleach.
- Use gloves and work in a ventilated area.
- Keep the bleach container upright and tightly closed.
- Do not pour bleach above a laundry basket or near clean clothing.
- Avoid overfilling measuring caps or spray bottles.
- Store bleach in its original labeled container.
- Keep bleach away from children and pets.
- Do not transfer cleaning chemicals into beverage bottles or unmarked containers.
- Wash your hands after handling bleach.
- Check cuffs and sleeves before leaning against a recently cleaned surface.
If you use bleach in a washing machine, follow the appliance and product instructions. Add it only through the designated dispenser, when provided, and do not pour concentrated chlorine bleach directly onto colored clothing.
Frequently Asked Questions
Can a bleach stain be removed?
Not in the same way as an ordinary stain. Bleach removes or alters the fabric dye. The practical solutions are recoloring, redyeing, covering, or redesigning the affected area.
What is the easiest solution for a tiny bleach spot?
A color-matched fabric marker is usually the easiest option for a small mark on a solid-colored, washable garment. Test it in a hidden area and apply several thin layers.
Can I use a black marker on black clothes?
A black fabric marker may work, but black fabrics have different undertones. Test the marker first and apply it lightly. A dense black circle can be more visible than the original pale spot.
Will dye cover bleach damage completely?
Not always. The damaged section may absorb dye differently from the rest of the garment. Dyeing the entire item a darker color often produces a better result than dyeing only the spot, but some variation may remain.
Can delicate clothing be repaired at home?
Silk, wool, satin, lace, vintage garments, and dry-clean-only items are easier to damage. A professional textile repair specialist or cleaner is the safer choice.
What if the fabric has developed a hole?
Dye or a marker will not repair weakened fibers. Reinforce the area with stitching, a patch, darning, or professional mending.
Final Thoughts
Bleach damage is permanent color loss, but it does not always mean the garment must be discarded. A small dot may be disguised with a fabric marker, while larger damage may respond better to full-garment dyeing, a patch, embroidery, or creative redesign.
Start by rinsing the garment thoroughly, washing it according to its care label, and allowing it to dry. Then choose a repair suited to its fiber, color, and condition. Most importantly, avoid unverified chemical tricks and never mix bleach with other cleaning products.
Even if the repair is not invisible, a careful, intentional design can make the garment wearable again and keep it out of the trash.