Introduction to These Incredible Butterscotch Bars
There’s something unquestionably irresistible about a warm, chewy dessert bar—especially when that bar is packed with rich brown sugar flavor, melted butter, and sweet butterscotch chips that create pools of caramel-like goodness with every bite.
These Butterscotch Bars are the type of dessert that instantly becomes a family favorite. Not only did they receive glowing praise—“These bars were an absolute hit! Will make again!”—but they also deliver everything you want in a homemade treat: simplicity, comfort, nostalgia, and a beautiful balance of flavors.
The magic lies in how effortlessly these bars come together. With just a handful of pantry staples, minimal prep time, and a short bake, you can whip up a dessert that tastes like it came straight out of a bakery.
Whether you’re bringing them to a party, adding them to a bake sale, or just making something sweet for a cozy night at home, these bars always steal the spotlight. And once you cut them into warm, golden squares, you’ll understand why they’re the kind of recipe people make again and again.
Why This Butterscotch Bars Recipe Works So Well
What makes this recipe particularly special is its structure. The foundation of melted butter and brown sugar creates a rich, caramelized flavor base that gives the bars their signature chewy texture. Unlike cookies that require creaming butter or dough that needs chilling, these bars are based on simple mixing—no fuss, no special techniques, just pure baking joy.
The brown sugar interacts with the melted butter to produce a deep molasses undertone, while the eggs provide moisture and lift. Flour and baking powder create structure without causing dryness. And of course, the butterscotch chips become soft, melty, and perfectly sweet pockets throughout the bars.
The balance between the buttery richness and the sweetness makes these bars feel indulgent without being overwhelming. They’re sturdy enough to slice cleanly yet soft enough to melt beautifully in your mouth. It’s the ideal dessert bar texture.
What You’ll Need for This Recipe: Ingredient Breakdown
Each ingredient plays an important role in making these bars delicious, chewy, and perfectly textured. Here’s why each one matters:
• Unsalted butter (melted): Creates a soft, rich, chewy base. Using melted butter instead of creamed butter leads to denser bars.
• Brown sugar: The heart of the recipe! It gives caramel depth, chewiness, and moisture.
• Eggs: Bind the mixture and ensure the bars stay soft.
• Vanilla extract: Adds warmth and enhances the butterscotch flavor.
• All-purpose flour: The structural backbone of the bars.
• Baking powder: Adds just enough lift without making the bars cakey.
• Salt: Balances the sweetness and enhances flavor.
• Butterscotch chips: The star ingredient—sweet, melty, caramel-like bursts in every bite.
Equipment You’ll Need to Make Butterscotch Bars
You don’t need any fancy tools to make this recipe, which is another reason it’s such a winner.
• 9×13-inch baking pan – Provides the ideal thickness.
• Two mixing bowls – One for wet ingredients, one for dry.
• Whisk or spoon – For mixing the batter.
• Rubber spatula – Helps fold in butterscotch chips cleanly.
• Measuring cups and spoons – Ensures accuracy.
• Oven mitts – Essential for safety.
• Cooling rack – Helps the bars set properly after baking.
Even with minimal equipment, this recipe consistently turns out bakery-quality bars.
How to Make These Butterscotch Bars (Step-by-Step Instructions)
Start by preheating your oven to 350°F (175°C) and preparing your baking pan by lightly greasing it. This ensures easy release after baking.
In your first bowl, combine the melted butter and brown sugar.
The warmth of the butter helps dissolve the sugar slightly, creating a glossy mixture. Add the eggs one at a time, mixing well to incorporate air and structure.
Stir in the vanilla extract.
In your second bowl, whisk together flour, baking powder, and salt. This ensures even distribution and prevents clumps of baking powder.
Slowly add the dry mixture into the wet, mixing until just combined. Overmixing can lead to tough bars, so stop as soon as the flour disappears.
Fold in the butterscotch chips using a spatula, then spread the batter evenly in your prepared pan. Bake for 25–30 minutes, or until the top turns golden and a toothpick inserted in the center comes out clean.
Allow the bars to cool before slicing. This step helps them set and ensures clean, even squares.
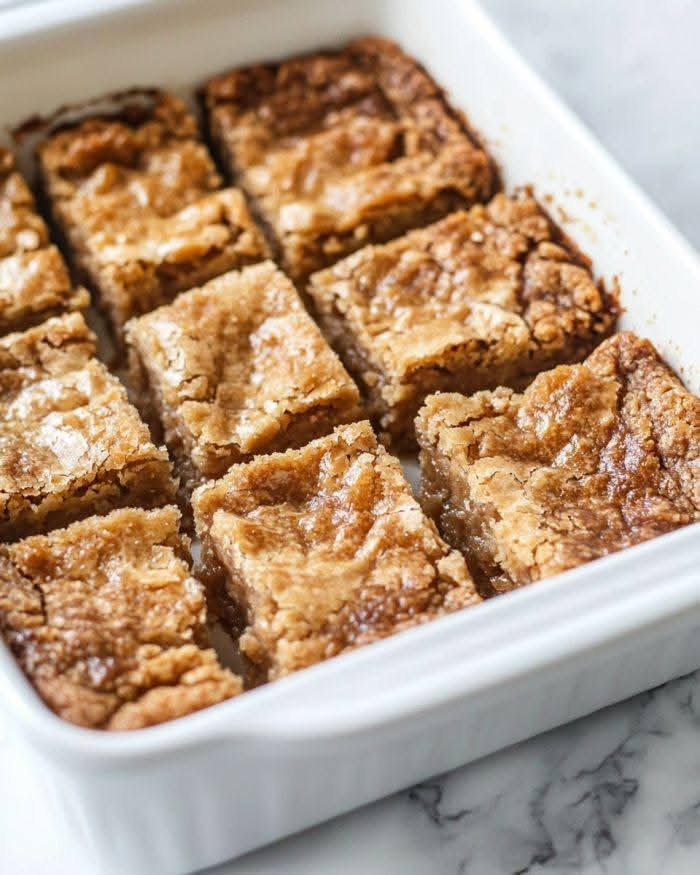
Understanding the Texture of Butterscotch Bars
These bars strike a perfect balance between chewy and soft. The edges develop a golden, slightly crisp bite, while the center stays gooey and rich. The melted butterscotch chips make pockets of sweetness throughout.
If you prefer softer bars, bake on the lower end of the time range. For firmer, more cookie-like bars, extend the baking time by 3–5 minutes. The texture can be customized without altering the recipe itself.
Tips + Tricks & More for Recipe Success
Here are the best tips to guarantee perfect butterscotch bars every single time:
Do not overbake. The bars should look slightly soft in the center when removed—they firm as they cool.
Use parchment paper if you want easy removal. This allows you to lift the entire slab out for clean cutting.
Measure flour accurately. Too much flour results in dry, crumbly bars. Spoon and level—don’t scoop.
Melt the butter fully. This improves chewiness and helps the sugar incorporate.
Don’t overmix the batter. Mix just until combined to avoid toughness.
Use fresh brown sugar. Hard, old sugar won’t mix smoothly and changes the texture.
Customize sweetness. If you want less sugar, reduce brown sugar by up to ¼ cup; texture remains the same.
Try swirling in chocolate. If you want a marbled effect, add a few tablespoons of melted chocolate on top before baking.
Let bars cool completely. Warm bars are delicious but crumble easily; cooling improves structure.
Use quality butterscotch chips. They melt better and don’t harden excessively.
These techniques transform a simple recipe into a consistently excellent dessert.
How to Serve These Butterscotch Bars
These bars can be served in countless delicious ways, depending on the occasion. For a traditional approach, simply slice into squares or rectangles once cooled. Their chewy texture makes them easy to pick up, pack, and enjoy without utensils.
If you’re serving them at a party, arrange the bars on a decorative platter. They also pair beautifully with warm beverages like coffee, hot chocolate, chai lattes, or black tea.
For a more indulgent presentation, warm a bar for 10 seconds in the microwave and top with a scoop of vanilla or caramel ice cream. The contrast between warm bars and cold ice cream is irresistible.
Serving Suggestions & Creative Variations
Here are some fun ways to customize or enhance your serving experience:
• Add a drizzle of caramel sauce for double butterscotch flavor.
• Serve with whipped cream for a lighter, creamy contrast.
• Pair with salted nuts like pecans or walnuts on the side.
• Top with a sprinkle of flaky sea salt for a sweet-salty finish.
• Serve with fresh berries—the tartness balances the sweetness.
• Turn them into ice cream sundaes by layering crumbled bars with ice cream and syrup.
• Serve warm with espresso for a coffee-shop-style treat.
Whether you’re making them for holidays, gatherings, school events, or a cozy night in, these bars adapt perfectly to any setting.
How Long This Recipe Takes to Make
Here’s the full breakdown of the time required for this dessert:
• Prep time: 10 minutes
• Mixing time: 5 minutes
• Baking time: 25–30 minutes
• Cooling time: 20–30 minutes
Total time: Approximately 1 hour from start to finish.
It’s an incredibly efficient recipe—fast enough for a last-minute dessert yet delicious enough for special occasions.
Storage and Make-Ahead Tips
These bars store beautifully, making them ideal for meal prep, gifting, or holiday baking.
• Room temperature: Store in an airtight container for up to 4 days.
• Refrigerator: Store for up to 1 week; they become slightly firmer.
• Freezer: Freeze for up to 3 months wrapped tightly.
• Reheating: Microwave for 8–12 seconds for a soft, fresh-baked texture.
Because their flavor deepens over time, the bars may taste even better the next day.
Troubleshooting & Common Mistakes to Avoid
If your bars don’t turn out perfectly the first time, here are potential reasons:
• Bars are dry: Overbaked or too much flour.
• Bars crumble when cutting: Not cooled enough.
• Bars too sweet: Reduce brown sugar by ¼ cup or use semi-sweet chocolate instead of butterscotch chips.
• Bars too greasy: Butter measurement was off—melt first, then measure.
• Bars too thick or thin: Use the recommended 9×13-inch pan for ideal height.
Final Thoughts on These Amazing Butterscotch Bars
These butterscotch bars are more than just a simple dessert—they’re the kind of comforting, nostalgic, delicious treat that brings people together.
They’re easy enough for beginners yet impressive enough for holidays, potlucks, or special events. Their rich brown-sugar flavor, chewy texture, golden crust, and melty butterscotch chips make them unforgettable.