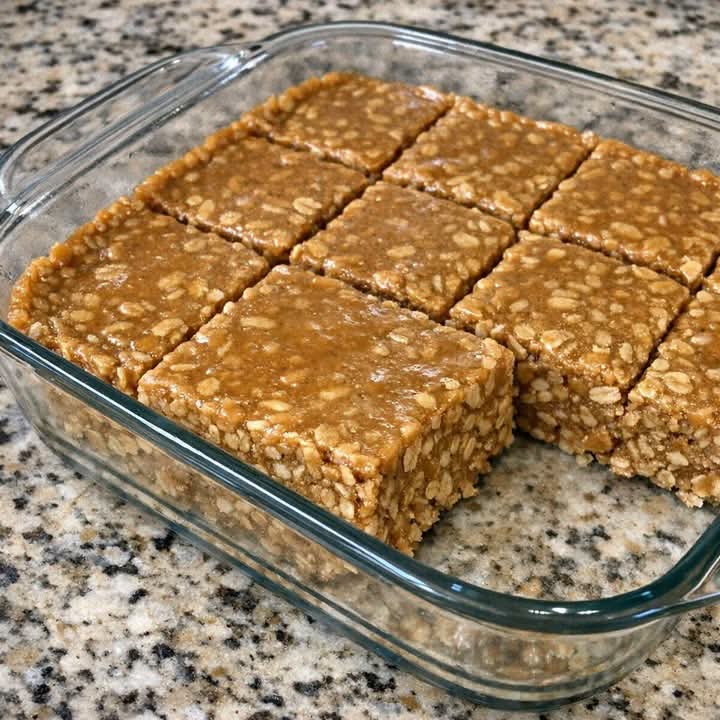
These 3-Ingredient Peanut Butter Oat Bars combine creamy peanut butter, pure maple syrup, and rolled oats in a chewy, satisfying no-bake treat. The peanut butter creates a rich, nutty base, while maple syrup adds sweetness and helps bind the hearty oats together.
Because the bars require only a few minutes on the stovetop, they are practical for busy weekdays, summer cookouts, picnics, lunch boxes, and last-minute potlucks. Chill them until firm, cut them into squares, and keep them refrigerated for an easy homemade snack that travels well.
Why You’ll Love This Recipe
These simple peanut butter oatmeal bars prove that a short ingredient list can still produce a flavorful and dependable treat.
Only three ingredients: Everything is easy to find in a typical U.S. grocery store.
No oven required: You only need the stovetop to warm the peanut butter and maple syrup.
Quick preparation: The mixture takes about 10 minutes to assemble before chilling.
Naturally sweetened: Pure maple syrup provides all the sweetness needed.
Easy to transport: Once thoroughly chilled, the bars hold together well for picnics and potlucks.
Simple to prepare ahead: They can be refrigerated or frozen until needed.
Easy to customize: Optional additions can change the flavor without altering the basic method.
The finished bars are dense and pleasantly chewy rather than crisp or cake-like. Their texture falls somewhere between a soft granola bar and a no-bake oatmeal square.
Key Ingredient Notes
With only three ingredients, choosing the right type of each one makes a noticeable difference.
Creamy Peanut Butter
Regular creamy peanut butter produces the most consistent texture because its oils remain well blended. It creates bars that are smooth, cohesive, and easy to slice.
Natural peanut butter also works, but it must be stirred thoroughly before measuring. If the oil has separated, stir the entire jar until the peanut butter is completely uniform. An oily or unusually dry spoonful may prevent the mixture from binding correctly.
For accurate results, measure the peanut butter in a dry measuring cup and level the top. A flexible spatula helps remove it cleanly.
Pure Maple Syrup
Maple syrup sweetens the bars and supplies the moisture needed to hold the oats together. Use pure maple syrup rather than pancake syrup for the intended flavor and consistency.
Do not reduce the maple syrup significantly. The mixture may taste less sweet, but it may also become too dry and crumbly to press into bars.
Old-Fashioned Rolled Oats
Old-fashioned rolled oats provide the hearty, visible oat texture shown in the finished bars. They absorb some of the warm peanut butter mixture while retaining a pleasantly chewy bite.
Quick oats may be used in a pinch, but they absorb moisture more rapidly and create a softer, more compact bar. Steel-cut oats are not suitable because they remain too firm for this no-bake method.
Recommended Kitchen Equipment
You do not need specialized equipment to make 3-Ingredient Peanut Butter Oat Bars. A few basic tools make the process easier:
8-inch square baking dish: This size produces substantial bars that are neither too thin nor excessively thick.
Parchment paper: A parchment sling allows the entire chilled slab to lift out cleanly.
Medium saucepan: It provides enough room to warm the wet ingredients and fold in the oats.
Heat-resistant spatula: Useful for stirring the sticky mixture and scraping the saucepan.
Measuring cups: Accurate proportions are important because there are only three ingredients.
Sharp chef’s knife: A sharp blade produces cleaner portions after the bars have chilled.
Airtight storage container: It prevents the refrigerated bars from drying out or absorbing other food odors.
If parchment paper is unavailable, lightly grease the baking dish. The first piece may be slightly more difficult to remove, but the recipe will still work.
How to Make 3-Ingredient Peanut Butter Oat Bars
Prepare the Pan
Line an 8-inch square baking dish with parchment paper, leaving enough overhang on two opposite sides to form handles. This makes it easy to lift the chilled oat mixture out in one piece.
You may lightly grease the pan instead, but parchment produces neater results.
Warm the Peanut Butter and Maple Syrup
Place 1 cup of creamy peanut butter and 1/2 cup of maple syrup in a medium saucepan. Set the pan over low heat and stir continuously.
Warm the mixture just until it becomes smooth, glossy, and easy to stir, approximately 2 to 4 minutes. It does not need to boil. Excessive heat can make the peanut butter thicken or become oily.
Add the Rolled Oats
Remove the saucepan from the heat. Add 2 cups of old-fashioned rolled oats and stir until every oat is evenly coated.
The mixture should be thick, sticky, and slightly difficult to stir. Scrape along the bottom and sides of the saucepan so no dry pockets of oats remain.
Press the Mixture Into the Dish
Transfer the mixture to the prepared baking dish. Spread it into the corners and press it into an even layer.
For firm, portable bars, cover the surface with a second piece of parchment and press down firmly with your hands or the flat bottom of a measuring cup. Pay particular attention to the corners and edges, where loosely packed oats are more likely to crumble.
For a softer snack-style bar, use the back of a spoon to press the mixture more gently.
Chill and Slice
Refrigerate the pan for 1 to 2 hours, or until the mixture feels firm when pressed in the center. Use the parchment handles to lift the slab onto a cutting board.
Cut it into 12 bars or squares using a sharp knife. For especially neat edges, chill the bars for the full 2 hours and wipe the knife between cuts.
Professional Tips for the Best Results
Keep the Heat Low
The goal is to loosen the peanut butter and combine it with the maple syrup—not to cook or boil the mixture. Gentle heat helps the ingredients remain smooth and easy to mix.
Measure Before Heating
Have the oats measured and ready before placing the saucepan on the stove. Once the peanut butter mixture is warm, you can immediately remove it from the heat and fold in the oats.
Stir Natural Peanut Butter First
If using natural peanut butter, mix the separated oil completely back into the jar before measuring. The texture should be creamy from top to bottom.
Compress the Mixture Evenly
Firm pressure is the key to bars that hold their shape. An unevenly packed pan may produce firm bars in the center and crumbly ones around the edges.
Allow Enough Chilling Time
Although the bars may look ready after 30 minutes, a longer chill gives the oats time to settle into the peanut butter mixture. One to two hours creates a cleaner, sturdier result.
Keep Them Cool for Travel
These bars travel well when chilled, but peanut butter softens in warm weather. For a summer picnic or cookout, pack them in a covered container inside an insulated cooler.
Common Mistakes and How to Avoid Them
The Bars Crumble When Cut
This usually happens when the mixture was not pressed firmly enough or was sliced before it had completely chilled. Return crumbly bars to the pan, press them down again, and refrigerate until firm.
Incorrect proportions can also cause crumbling. Use the full 1 cup of peanut butter and 1/2 cup of maple syrup for 2 cups of oats.
The Mixture Is Too Dry
Dryness may result from adding too many oats, using an unusually firm peanut butter, or packing the measuring cups too heavily. Measure the oats by spooning them lightly into the cup and leveling the top.
The Bars Are Too Soft
Confirm that you used old-fashioned rolled oats and allowed at least 1 hour of chilling. Natural peanut butter with a high oil content may also produce softer bars. Stir it thoroughly before measuring and keep the finished bars refrigerated.
The Peanut Butter Becomes Oily
The saucepan was probably too hot. Use low heat, stir continuously, and remove the pan as soon as the mixture is smooth. It should never reach a vigorous simmer.
The Bars Stick to the Dish
A parchment-paper sling is the easiest solution. If you grease the dish instead, run a thin knife around the edges before removing the first bar.
Recipe Variations and Substitutions
The original 3-Ingredient Peanut Butter Oat Bars need no additional ingredients, but the following optional variations can provide a different flavor or texture.
Quick-oat version: Replace the rolled oats with the same amount of quick oats. Expect a softer, more uniform texture.
Crunchy peanut butter: Use crunchy peanut butter for small peanut pieces throughout the bars.
Almond or cashew butter: Substitute an equal amount of another creamy nut butter. Flavor and firmness will vary.
Sunflower seed butter: This can be used as a peanut-free variation when appropriate, but always check every package if serving someone with an allergy.
Optional chocolate: Fold in mini chocolate chips after the mixture has cooled slightly so they do not completely melt.
Optional cinnamon: Add a small amount of ground cinnamon with the oats for a warmer flavor.
Optional finishing salt: A light sprinkle of flaky salt can balance the maple sweetness.
Any substitution may change the estimated nutrition and final consistency.
What to Serve With Peanut Butter Oat Bars
These bars are substantial enough to serve alone, but they also fit naturally into a larger snack spread. Pair them with fresh strawberries, apple slices, grapes, or bananas for contrasting freshness.
For a cookout or potluck, arrange smaller squares beside cookies, brownies, and fruit. Their firm texture makes them easy to pick up without utensils. They are also useful for packed lunches, road-trip snack boxes, or an afternoon coffee break.
For children, cut the slab into 16 smaller squares rather than 12 large bars. Remember to confirm that peanut products are allowed before sending them to a school or shared event.
Make-Ahead Instructions
Prepare the bars up to three days before a party or picnic. Leave the chilled slab whole in the pan and cover it tightly. Slice it on the day of serving for the cleanest-looking edges.
You can also portion the bars immediately and separate the layers with parchment paper. This makes it easy to transfer them directly into lunch containers or a picnic cooler.
Estimated cost: Depending on local prices and the type of peanut butter and maple syrup used, the full batch costs approximately $5 to $7, or about $0.42 to $0.58 per bar. This is only an estimate and will vary by store, region, and brand.
Storage and Freezing
Store 3-Ingredient Peanut Butter Oat Bars in an airtight container in the refrigerator for up to one week. Place parchment paper between layers to keep the surfaces neat.
The bars can remain at a cool room temperature for a few hours, but they become softer as they warm. Refrigeration is recommended for the most dependable texture.
To freeze them, arrange the cut bars in a single layer until firm, then transfer them to a freezer-safe container. Separate multiple layers with parchment. Freeze for up to three months.
Thaw individual bars in the refrigerator overnight or leave them at room temperature for approximately 15 to 30 minutes. No reheating is necessary. Avoid microwaving them unless you intentionally want a very soft, warm texture.
Frequently Asked Questions
Are these peanut butter oat bars baked?
No. The peanut butter and maple syrup are briefly warmed on the stovetop, but the assembled bars set in the refrigerator without baking.
Can I make these bars with quick oats?
Yes. Use the same quantity, but expect a softer, denser bar with less visible oat texture. Old-fashioned rolled oats produce the chewiest result.
Why are my no-bake oat bars falling apart?
The mixture may not have been compressed firmly enough, or the bars may need more time in the refrigerator. Incorrect measurements or very dry peanut butter can also make them crumbly.
Can I use natural peanut butter?
Yes, provided it is stirred extremely well before measuring. Fully incorporate the separated oil so the peanut butter has an even consistency.
Do peanut butter oat bars need to be refrigerated?
Refrigeration is recommended because it keeps the bars firm and makes them easier to handle. They can sit out briefly for serving but will soften in a warm room.
Can I freeze 3-Ingredient Peanut Butter Oat Bars?
Yes. Freeze the sliced bars in an airtight, freezer-safe container for up to three months, placing parchment between layers.
Can I double the recipe?
Yes. Double every ingredient and press the mixture into a 9-by-13-inch pan. The exact thickness may differ slightly, so chill until the center is completely firm before slicing.
Printable Recipe Card
3-Ingredient Peanut Butter Oat Bars
Chewy no-bake oat bars made with creamy peanut butter, pure maple syrup, and old-fashioned rolled oats. They are easy to prepare for snacks, picnics, cookouts, and make-ahead treats.
Prep time: 10 minutes
Cook time: 4 minutes
Chill time: 1–2 hours
Total time: 1 hour 14 minutes to 2 hours 14 minutes
Servings: 12 bars
Ingredients
1 cup creamy peanut butter
1/2 cup pure maple syrup
2 cups old-fashioned rolled oats
Instructions
1. Line an 8-inch square baking dish with parchment paper, leaving an overhang on two sides. Alternatively, lightly grease the dish.
2. Add the peanut butter and maple syrup to a medium saucepan.
3. Warm over low heat for 2 to 4 minutes, stirring continuously, until smooth, glossy, and completely combined. Do not boil.
4. Remove the saucepan from the heat. Add the rolled oats and stir until every oat is evenly coated and no dry pockets remain.
5. Transfer the mixture to the prepared dish and spread it evenly into the corners.
6. Place a piece of parchment over the surface and press down firmly to compact the mixture.
7. Refrigerate for 1 to 2 hours, or until firm in the center.
8. Lift the chilled slab from the pan using the parchment overhang. Cut into 12 bars or squares and serve chilled or slightly softened.
Notes
Old-fashioned rolled oats provide the best hearty, chewy texture.
Quick oats can be substituted, but the bars will be softer and more compact.
If using natural peanut butter, stir it thoroughly before measuring.
Press firmly for bars that hold together during transport.
These bars soften in warm conditions, so carry them in an insulated cooler for outdoor summer events.
This no-bake recipe does not require a safe internal cooking temperature.
Storage Instructions
Refrigerate the bars in an airtight container for up to one week, separating layers with parchment paper. Freeze for up to three months. Thaw in the refrigerator overnight or at room temperature for 15 to 30 minutes.
Estimated Nutrition
Per bar, based on 12 servings: approximately 210 calories, 6 grams protein, 22 grams carbohydrates, 11 grams fat, 2 grams fiber, 10 grams sugar, and 95 milligrams sodium.