Introduction
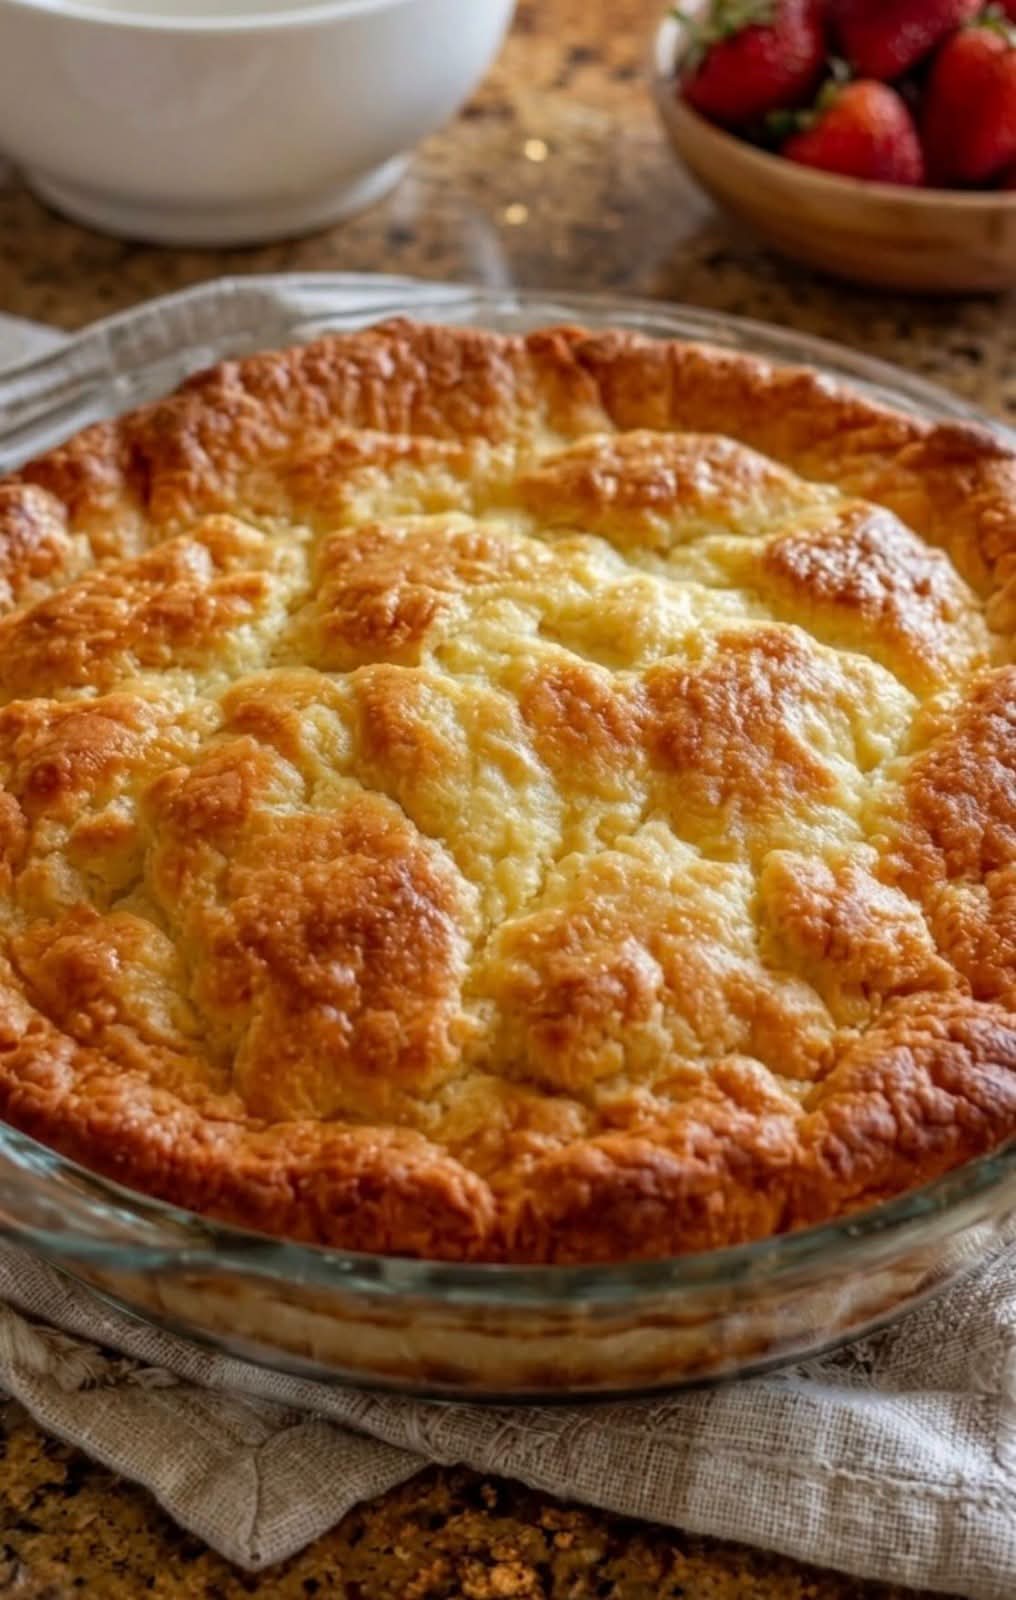
Old-Fashioned Pan-Baked Shortcake is a simple, rustic dessert with a crisp, deeply golden surface and a tender, buttery center. Unlike individually cut shortcakes, the dough is pressed directly into a pie dish and baked as one large round. This approach reduces preparation time while creating an attractive homemade appearance with plenty of browned edges and an irregular, lightly sugared top.
The texture falls somewhere between a traditional biscuit and a lightly sweetened cake. Cold butter produces small flaky pockets, while buttermilk keeps the interior tender and adds subtle tanginess. A little vanilla complements the buttery flavor without making the shortcake overly sweet.
This recipe can be served on its own, warm from the baking dish, or paired with fresh strawberries and whipped cream for a classic shortcake dessert. It is also versatile enough to accompany other seasonal fruits. Because the shortcake itself is only moderately sweet, the toppings can be adjusted according to taste.
Preparation requires no mixer, rolling pin, or biscuit cutter. The dough is mixed in one bowl, transferred to a 9-inch pie dish, brushed with butter, sprinkled with sugar, and baked until golden. The intentionally uneven surface shown in the finished dish is part of its rustic appeal.
Why This Recipe Works
Several straightforward techniques give this shortcake its rich flavor and characteristic texture.
Cold butter creates a tender texture
Small pieces of cold butter remain dispersed throughout the dough. As the shortcake bakes, the butter melts and releases steam, helping create a light, tender crumb with slightly flaky sections. Leaving a few pea-sized pieces intact is important; completely blending the butter into the flour can make the finished shortcake more uniform and less flaky.
Buttermilk provides moisture and flavor
Buttermilk hydrates the dry ingredients while adding a mild tang that balances the sugar and butter. Its acidity also works with the baking powder to support a good rise. Keeping the buttermilk cold helps prevent the butter from softening before the pan enters the oven.
The dough requires minimal handling
This dough should look soft and slightly shaggy rather than perfectly smooth. Gentle mixing limits gluten development, which helps prevent a dense or tough texture. Pressing the dough directly into the baking dish also eliminates the additional handling involved in rolling and cutting individual biscuits.
The topping adds color and contrast
Brushing the surface with melted butter promotes browning and gives the crust a richer flavor. The final spoonful of sugar creates a delicate sweet crunch that contrasts with the tender center.
Baking in one pan keeps preparation simple
A pie dish contains the soft dough while allowing it to rise into a thick, shareable shortcake. The edges receive direct heat from the dish and become especially golden, while the center remains soft and substantial.
Ingredients You’ll Need
The ingredient list is short, so accurate measuring and proper ingredient temperatures make a noticeable difference.
- 2 cups all-purpose flour: Provides the structure of the shortcake.
- 1/2 cup granulated sugar: Lightly sweetens the dough.
- 1 tablespoon baking powder: Helps the shortcake rise and gives it a lighter crumb.
- 1/2 teaspoon salt: Balances the sweetness and strengthens the overall flavor.
- 1/2 cup cold unsalted butter, cubed: Adds richness and creates tender, flaky pockets. This equals one standard U.S. stick.
- 3/4 cup cold buttermilk: Moistens the dough and contributes mild tanginess.
- 1 teaspoon vanilla extract: Adds a subtle warm flavor.
- 1 tablespoon melted butter: Used for brushing the surface before baking.
- 1 tablespoon coarse or granulated sugar: Creates a lightly crisp, sparkling topping.
For serving, fresh strawberries and whipped cream are optional and are not required to prepare the shortcake itself.
Ingredient Notes and Substitutions
All-purpose flour
Measure flour by spooning it into the measuring cup and leveling the top with a straight edge. Scooping directly from the bag can pack too much flour into the cup, producing a dry dough. A digital kitchen scale offers the greatest accuracy; 2 cups of all-purpose flour generally weigh approximately 240 grams, depending on the measuring method.
Unsalted butter
Unsalted butter allows better control over the salt in the recipe. It should be cold and firm when added to the flour. Cut it into small cubes and return it to the refrigerator if it begins to soften while the other ingredients are being prepared.
Salted butter can be substituted if necessary. If using it, reduce the added salt slightly to prevent the finished shortcake from tasting overly salty.
Buttermilk
Full-fat or low-fat cultured buttermilk will work. Shake the container before measuring because buttermilk can separate while refrigerated.
If buttermilk is unavailable, an optional homemade substitute can be prepared by placing 2 1/4 teaspoons of lemon juice or white vinegar in a measuring cup and adding enough milk to equal 3/4 cup. Let it stand for 5–10 minutes before using. The flavor and thickness may differ slightly from commercial cultured buttermilk.
Topping sugar
Coarse sugar creates a more noticeable crunch and sparkle. Regular granulated sugar works equally well but produces a finer crust. Either option should be sprinkled evenly after the surface has been brushed with melted butter.
Baking dish
A 9-inch glass, ceramic, or metal pie dish may be used. Metal generally browns the crust more quickly, while glass allows you to monitor the color around the bottom and sides. Baking time can vary slightly depending on the material and depth of the dish.
How to Make Old-Fashioned Pan-Baked Shortcake
Prepare the oven and baking dish
Preheat the oven to 400°F (200°C). Give the oven enough time to reach the full temperature before baking; strong initial heat helps the shortcake rise and sets its outer crust.
Lightly grease a 9-inch round pie dish with butter. Cover the bottom and sides with a thin, even layer rather than leaving thick deposits that could make the edges greasy.
Combine the dry ingredients
Place the all-purpose flour, granulated sugar, baking powder, and salt in a large mixing bowl. Whisk thoroughly so the baking powder and salt are evenly distributed. This step helps the shortcake rise consistently without pockets of concentrated leavening.
Cut in the cold butter
Add the cubed cold butter to the flour mixture. Use a pastry cutter or two forks to work it into the dry ingredients. Continue until the mixture resembles coarse crumbs but still contains a few visible pea-sized pieces of butter.
Avoid using warm hands for an extended period because body heat can soften the butter. If the mixture becomes greasy or the butter begins melting, place the bowl in the refrigerator for about 10 minutes before continuing.
Add the buttermilk and vanilla
Stir the vanilla extract into the cold buttermilk. Pour this mixture over the flour and butter.
Fold gently with a flexible spatula or wooden spoon just until the dry ingredients are moistened. The dough should be soft, thick, and slightly shaggy. A few floury streaks can be folded in carefully, but the mixture should not be beaten or stirred until smooth.
Transfer the dough to the dish
Spoon the dough into the prepared pie dish. Gently spread it toward the edges and press it into a reasonably even layer. Do not pack it tightly or repeatedly smooth the top.
Leave the surface naturally uneven, with gentle ridges and mounds. These raised areas brown attractively and create the rustic appearance associated with pan-baked shortcake.
Add the topping
Brush the surface with 1 tablespoon of melted butter. Use a light touch so the brush does not flatten the dough. Sprinkle 1 tablespoon of coarse or granulated sugar evenly over the top.
Bake until golden
Bake for 25–30 minutes. The finished shortcake should be puffed, deeply golden across the top, and set in the center.
Begin checking near the 25-minute mark. Insert a toothpick into the thickest central area; it should emerge clean or with a few moist crumbs, but not wet dough. An instant-read thermometer inserted into the center should generally register about 200–205°F (93–96°C), indicating that the flour-based center has baked through.
If the top becomes dark before the center is ready, cover the dish loosely with aluminum foil for the remaining baking time. Do not seal the foil tightly, as trapped steam may soften the crust.
Cool before slicing
Place the baking dish on a heat-safe rack and allow the shortcake to cool for approximately 15 minutes. This resting time allows the crumb to settle, making the dessert easier to slice without becoming gummy or breaking apart excessively.
Serve it warm or let it cool completely to room temperature.
Tips and Tricks for Recipe Success
Keep the ingredients cold
The butter and buttermilk should remain cold until they are added. If the kitchen is warm, cube the butter first and refrigerate it while measuring the dry ingredients. Cold ingredients are central to achieving a tender, lightly flaky texture.
Check the baking powder
Because this recipe depends on baking powder for its rise, use a fresh product that has been stored in a dry place. Old baking powder can result in a shortcake that remains heavy or flat.
Stop mixing as soon as the dough comes together
Overmixing develops gluten and distributes the butter too thoroughly. Both can make the finished shortcake tougher. Fold only until no large pockets of dry flour remain.
Evaluate the dough before adding liquid
Humidity and flour-measuring methods can affect consistency. The dough should be moist enough to hold together but thick enough to mound in the dish. If it looks soft and shaggy, it is correct; it does not need to resemble a pourable cake batter.
Do not flatten the surface
An uneven top is intentional. Its peaks become crisp and golden, while the lower sections remain soft. Aggressively smoothing or compressing the dough removes this appealing variation in texture.
Monitor the center
A golden surface alone does not guarantee that the thick center has baked completely. Check the middle with a toothpick, thin knife, or instant-read thermometer before removing the dish from the oven.
Let the shortcake rest
Cutting immediately can compress the tender crumb and release too much steam. A 15-minute cooling period gives the interior time to stabilize while keeping it warm enough to serve.
Recipe Variations
The basic recipe is complete as written. The following ideas are optional and should be treated as variations rather than required ingredients.
Citrus shortcake
Add 1–2 teaspoons of finely grated lemon or orange zest to the sugar before whisking it with the remaining dry ingredients. This adds fragrance without changing the dough’s moisture level significantly.
Cinnamon-sugar topping
Combine the topping sugar with an optional 1/4 teaspoon of ground cinnamon before sprinkling it over the buttered dough. This variation works particularly well when serving the shortcake with apples, pears, or peaches.
Almond variation
Replace the vanilla with an equal amount of almond extract for a more pronounced flavor. Almond extract can be strong, so avoid adding more than the listed quantity.
Individual portions
The dough may be divided among greased oven-safe ramekins for individual shortcakes. Because smaller portions bake more quickly, begin checking them well before the original 25-minute baking time. Remove them when they are golden and fully set in their centers.
Square-pan presentation
An 8-inch square baking pan can be used in place of the pie dish. The corners may brown faster, so monitor the shortcake toward the end of baking. Cut the finished dessert into squares instead of wedges.
How to Serve
Run a thin knife around the outer edge if any portion has adhered to the baking dish. Cut the shortcake into wedges with a serrated knife, using a gentle sawing motion to preserve the tender interior.
Serve each wedge warm or at room temperature. It is flavorful enough to eat plain, especially while the sugared surface is still lightly crisp.
For a classic presentation, split a thick wedge horizontally and layer it with sliced fresh strawberries and whipped cream. The fruit juices soak into the crumb while the cream softens the crisp edges. These additions are optional and can be served separately so each person can assemble a portion according to preference.
Serving Suggestions
Old-Fashioned Pan-Baked Shortcake pairs well with a range of optional toppings:
- Fresh strawberries and lightly sweetened whipped cream
- Blueberries, raspberries, or blackberries
- Sliced peaches or nectarines
- Warm cooked apples or pears
- Fruit preserves or jam
- A small scoop of vanilla ice cream
- A light dusting of confectioners’ sugar
- Honey or maple syrup served sparingly
For brunch, serve plain wedges alongside coffee or tea. For dessert, offer fruit and cream in separate bowls. This keeps the remaining shortcake dry and makes storing leftovers easier.
Make-Ahead Instructions
The shortcake can be baked several hours before serving and kept covered at room temperature after it has cooled completely. For the best contrast between the crisp top and tender center, serve it on the day it is prepared.
The dry ingredients may also be whisked together in advance and stored in a covered bowl at room temperature. Wait to cut in the butter and add the buttermilk until shortly before baking.
Another option is to cut the butter into the dry mixture, cover the bowl, and refrigerate it for several hours. Add the cold buttermilk and vanilla only when the oven is preheated and the baking dish is ready. Once wet and dry ingredients are combined, the dough should be baked promptly so the leavening can work effectively.
Storage and Reheating Instructions
Room-temperature storage
Allow the shortcake to cool completely, then cover the baking dish or transfer the wedges to an airtight container. Store at room temperature for up to 2 days. Do not cover it while warm because condensation will soften the top.
Refrigerator storage
For longer storage, refrigerate the shortcake in an airtight container for up to 4 days. Refrigeration can make the crumb firmer, so reheating is recommended before serving.
If strawberries or whipped cream have been added, refrigerate the assembled portions promptly and consume them within 1–2 days. Whenever possible, store fruit, cream, and shortcake separately.
Freezer storage
Wrap cooled individual wedges securely and place them in a freezer-safe container. Freeze for up to 2 months. Thaw at room temperature or overnight in the refrigerator before reheating.
Reheating
To restore the edges, place the shortcake in a 325°F (165°C) oven for approximately 8–12 minutes. Individual wedges may require less time. Cover loosely with foil if the surface is already sufficiently browned.
A microwave can warm an individual serving in short intervals, but it will soften the crust. Oven reheating provides a texture closer to freshly baked shortcake.
Frequently Asked Questions
Is this shortcake the same as sponge cake?
No. Traditional American shortcake is usually biscuit-like rather than airy and spongy. This pan-baked version has a buttery, tender crumb and a crisp top. It is sturdy enough to absorb fruit juices without immediately falling apart.
Why did my shortcake turn out dense?
Common causes include overmixing the dough, using warm butter, measuring too much flour, or using baking powder that is no longer active. Mix only until the dough comes together and keep the ingredients cold.
Why is the center still wet when the top is brown?
The dough is thickest in the middle, so the top may brown before the center finishes baking. Cover the dish loosely with foil and continue baking until a toothpick inserted in the center comes out without wet dough.
Can I use regular milk instead of buttermilk?
Regular milk will hydrate the dough, but the flavor and texture may be different. A better optional substitute is milk combined with lemon juice or white vinegar, as described in the ingredient notes.
Can I reduce the sugar?
A small reduction is possible, but sugar contributes more than sweetness: it also affects moisture, tenderness, and browning. Reducing it substantially may produce a drier, paler shortcake.
Can I mix the dough with an electric mixer?
A mixer is unnecessary and may overwork the dough. A pastry cutter or two forks is better for cutting in the butter, followed by a spatula or wooden spoon for folding in the buttermilk.
How do I know when it is fully baked?
Look for a deeply golden surface, puffed edges, and a firm center. A toothpick should emerge clean or with a few crumbs. For an additional check, the center should reach approximately 200–205°F (93–96°C).
Can I add strawberries before baking?
This recipe is designed to bake without fruit mixed into the dough. Adding fresh strawberries could introduce excess moisture and affect the baking time. For the most reliable result, serve strawberries on top after baking.
How many servings does it make?
A 9-inch shortcake generally provides 8 standard wedges or 6 larger servings. The exact yield depends on how it is sliced and whether it is served with fruit or other accompaniments.
Final Conclusion
Old-Fashioned Pan-Baked Shortcake delivers the buttery flavor and tender texture of classic shortcake without the work of rolling and cutting individual portions. Cold butter, buttermilk, gentle mixing, and high oven heat create a thick, golden round with crisp peaks and a soft center.
The recipe is straightforward enough for everyday baking but makes an inviting dessert when served with optional strawberries and whipped cream. Whether offered plain, topped with seasonal fruit, or reheated for brunch the next day, this rustic pan-baked shortcake is a versatile recipe built from familiar pantry ingredients.