Seeded No Knead Jar Bread: The Easiest Homemade Artisan Loaf You’ll Ever Bake
Introduction
There is something deeply satisfying about baking your own bread at home—the aroma filling your kitchen, the golden crust forming in the oven, and that first warm slice with a soft, airy interior. But for many people, traditional bread-making can feel intimidating. Kneading, proofing, shaping—it all sounds like a lot of work. That’s where this Seeded No Knead Jar Bread completely changes the game.
This recipe is designed for simplicity without sacrificing quality. You don’t need special equipment, advanced skills, or hours of active work. Instead, you rely on time to do the heavy lifting. The long resting period allows the dough to naturally develop gluten, creating a beautiful structure and deep flavor—all without kneading.
What makes this bread even more special is the addition of seeds. Flax seeds, sunflower seeds, sesame seeds, or pumpkin seeds add texture, nutrition, and a subtle nutty flavor that elevates the bread from basic to artisan-level. Baking it in a jar or small dish gives it a unique shape and helps retain moisture, resulting in a soft interior and crisp crust.
Whether you are a beginner baker or someone looking for a foolproof bread recipe, this one delivers every time.
Why This Recipe Works
This recipe works because it uses a slow fermentation process instead of traditional kneading. When you mix flour, water, yeast, and salt, gluten begins to form naturally over time. Letting the dough rest for 8 to 12 hours allows this process to fully develop, creating a strong, elastic structure.
The sticky consistency of the dough is key. Unlike stiff doughs, this wetter mixture traps air bubbles as it ferments. These bubbles expand during baking, giving the bread its signature airy texture.
The seeds are not just decorative—they play an important role in both flavor and nutrition. They add crunch, richness, and healthy fats, making each bite more satisfying.
Baking in a jar or compact dish also contributes to the success of this recipe. It helps the dough maintain its shape and creates a slightly steamy environment, which improves crust formation and keeps the inside tender.
In short, this recipe works because it simplifies the science of bread-making while still delivering professional-quality results.
What You’ll Need For This Recipe
To make this delicious seeded jar bread, you only need a handful of simple pantry ingredients:
All-purpose flour forms the base of the bread and provides structure.
Salt enhances flavor and strengthens the dough.
Instant yeast helps the bread rise slowly and evenly.
Warm water activates the yeast and brings the dough together.
Mixed seeds add texture, nutrition, and visual appeal.
Honey or olive oil is optional but adds a subtle depth of flavor.
Extra seeds on top create a beautiful, crunchy crust.
You’ll also need a mixing bowl, a spoon, and a heat-safe glass jar or small baking dish. No stand mixer, no kneading surface—just simple tools for a simple process.
How To Make This Recipe
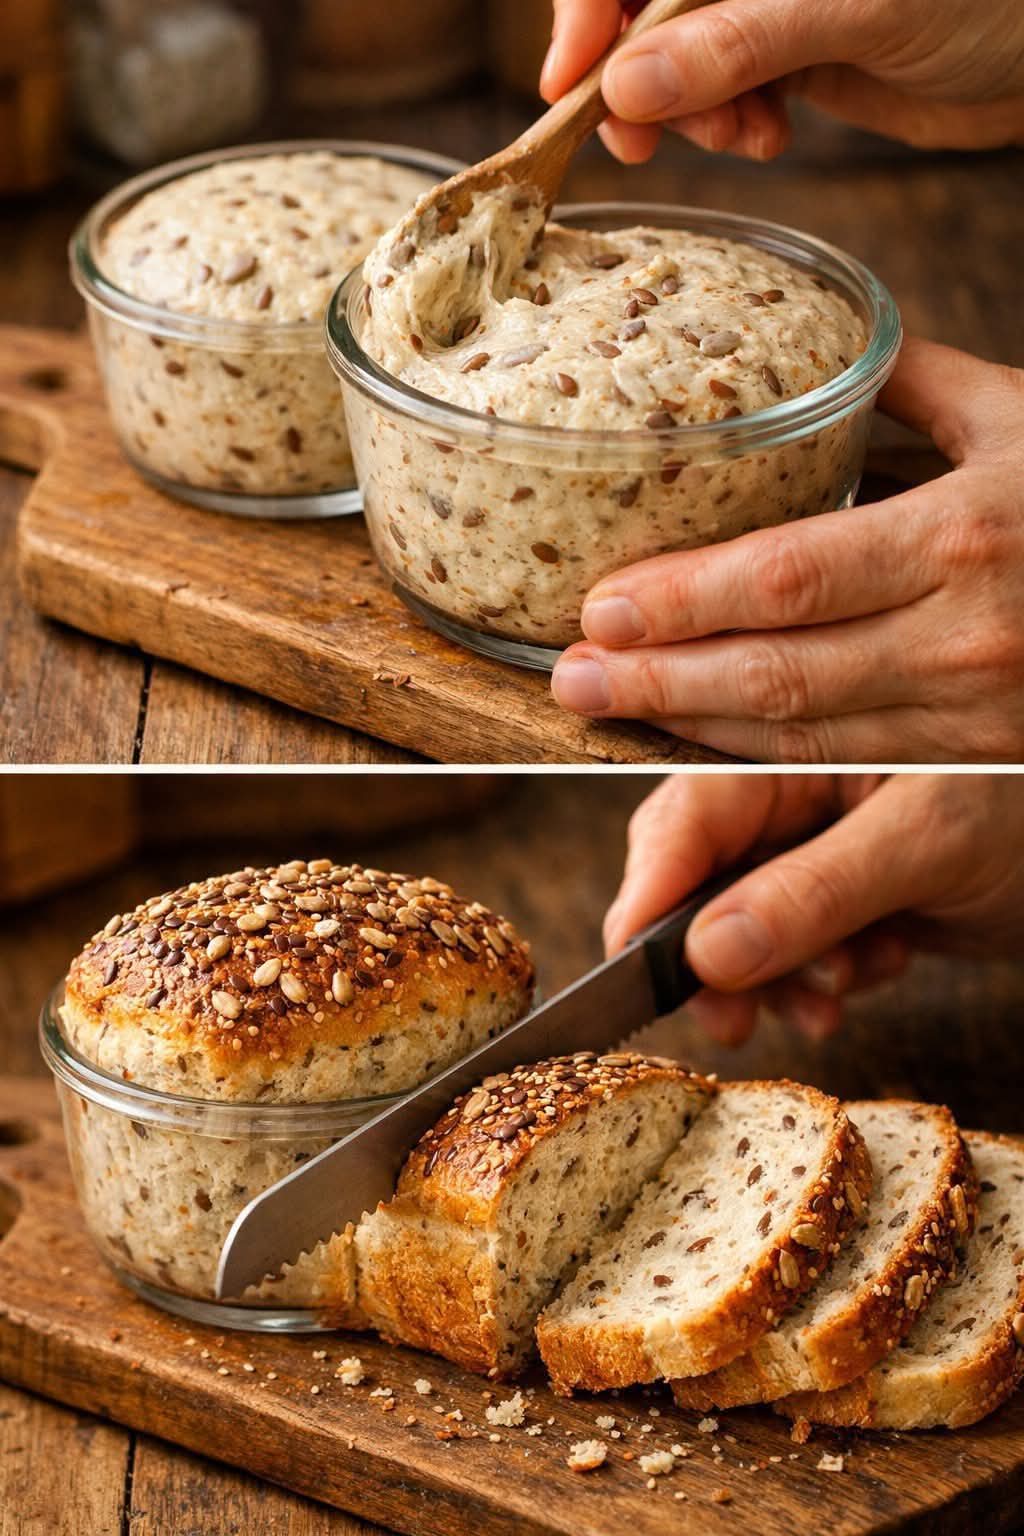
Start by combining the flour, salt, yeast, and mixed seeds in a bowl. Stir thoroughly so everything is evenly distributed.
Next, pour in the warm water and mix until a sticky dough forms. The dough should look rough and slightly wet—this is exactly what you want. Avoid adding extra flour, as that can make the bread dense.
Cover the bowl and let it rest at room temperature for 8 to 12 hours. During this time, the dough will rise, bubble, and develop flavor.
Once ready, lightly grease your jar or baking dish. Gently transfer the dough into it, being careful not to deflate it too much.
Sprinkle extra seeds on top for added texture and visual appeal.
Preheat your oven to 190°C (375°F), then bake the bread for 30 to 40 minutes. You’ll know it’s done when the top is golden brown and the loaf sounds hollow when tapped.
Let the bread cool slightly before slicing to preserve its structure.
Understanding the No Knead Method
The no knead method relies on time instead of effort. Traditional kneading aligns gluten strands quickly, but slow fermentation achieves the same effect gradually.
As the dough rests, enzymes break down proteins and starches, improving both texture and flavor. This method also makes the bread easier to digest compared to quickly made loaves.
It’s a perfect example of how patience can replace labor in cooking.
The Role of Seeds in This Bread
Seeds are more than just a topping—they transform the bread entirely. Flax seeds provide omega-3 fatty acids, sunflower seeds add crunch, sesame seeds bring a nutty aroma, and pumpkin seeds contribute richness.
Together, they create a balanced flavor profile and boost the nutritional value of the bread, making it both delicious and wholesome.
Tips + Tricks & More For Recipe Success
For the best results, always use fresh yeast. Old yeast may not activate properly, leading to a dense loaf.
Make sure your water is warm, not hot. High temperatures can kill the yeast, while cold water slows down fermentation too much.
Do not overmix the dough. A rough, sticky texture is ideal for creating air pockets.
Give the dough enough time to rise. Rushing this step will result in less flavor and a tighter crumb.
Grease your jar well to prevent sticking and make removal easier.
Check doneness by tapping the bread. A hollow sound means it’s fully baked.
Allow the bread to cool before slicing to avoid a gummy texture.
Common Mistakes to Avoid
One common mistake is adding too much flour. This can make the bread heavy instead of light and airy.
Another is shortening the resting time. The long fermentation is essential for both texture and flavor.
Using hot water instead of warm can kill the yeast instantly, preventing the dough from rising.
Skipping the cooling step can ruin the texture, so patience is key even after baking.
Variations You Can Try
You can easily customize this bread to suit your taste. Replace half of the all-purpose flour with whole wheat flour for a heartier version.
Add herbs like rosemary or thyme for an aromatic twist.
Mix in shredded cheese for a rich, savory variation.
For a slightly sweet version, add dried fruits and nuts.
You can even experiment with gluten-free flour blends designed for bread baking.
How to Serve This Bread
This bread is incredibly versatile. You can enjoy it warm with butter, olive oil, or your favorite spread.
It pairs beautifully with soups, salads, and stews, making it a great addition to any meal.
You can also use it for sandwiches, toast, or even as a base for bruschetta.
Serving Suggestions
For breakfast, serve it toasted with honey or jam.
For lunch, use it as sandwich bread with fresh vegetables and protein.
For dinner, pair it with hearty soups or roasted dishes.
For snacks, enjoy it with dips like hummus or soft cheese.
This bread adapts effortlessly to any occasion.
Time Required for This Recipe
Preparation time is only about 10 minutes.
Resting time takes 8 to 12 hours, depending on room temperature.
Baking time is 30 to 40 minutes.
In total, the process spans several hours, but the hands-on effort is minimal, making it perfect for busy schedules.
Nutritional Value and Benefits
This bread offers a balanced mix of carbohydrates, healthy fats, and plant-based protein.
The seeds contribute fiber, vitamins, and essential fatty acids, supporting heart health and digestion.
Because it’s homemade, you avoid preservatives and unnecessary additives found in store-bought bread.
It’s a wholesome option that fits well into a balanced diet.
Conclusion
Seeded No Knead Jar Bread is proof that baking doesn’t have to be complicated to be incredible. With just a few ingredients and minimal effort, you can create a beautiful, artisan-style loaf right in your own kitchen.
Its crunchy seeded crust, soft interior, and rich flavor make it a recipe you’ll want to return to again and again. Whether you’re new to baking or simply looking for an easier method, this bread delivers on every level—taste, texture, and simplicity.
Once you try it, you may never go back to store-bought bread again.