Introduction
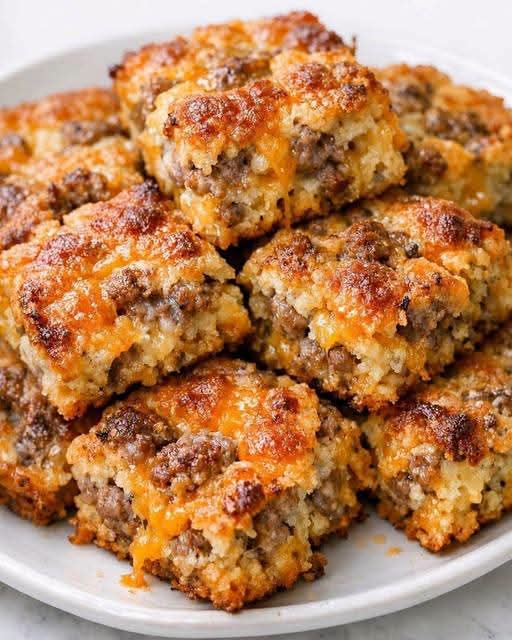
These 3-Ingredient Cheesy Sausage Squares combine savory breakfast sausage, sharp cheddar cheese, and buttery crescent dough in a warm, satisfying bake. The flaky crust surrounds a rich sausage-and-cheese filling, creating crisp edges, a soft center, and plenty of melted cheddar in every square.
Because the recipe uses only three readily available ingredients, it is a practical choice for breakfast, brunch, game-day gatherings, holiday mornings, or a simple family snack. The squares are also easy to portion, transport, and reheat.
For the quantities listed below, an 8×8-inch baking pan works best. A single 8-ounce can of crescent dough is not generally large enough to create both a bottom and top crust in a 9×13-inch pan. Using the smaller pan keeps the layers properly proportioned without requiring another ingredient or package.
Why This Recipe Works
This recipe succeeds because each ingredient serves a specific purpose.
The breakfast sausage provides the main flavor and gives the filling a substantial texture. Sharp cheddar adds creaminess and a stronger cheese flavor that stands up well to the seasoned pork. Crescent dough forms a tender, buttery crust on both the top and bottom.
Cooking and draining the sausage before assembling the dish is important. Removing the excess grease prevents the bottom crust from becoming overly oily or soggy. Stirring the cheddar into the sausage while it is still warm helps distribute the cheese evenly throughout the filling.
The 10-minute resting period after baking is equally useful. Straight from the oven, the cheese will be extremely soft, making clean slices difficult. Allowing the casserole to rest briefly helps the layers settle while keeping the squares warm and cheesy.
Ingredients You’ll Need
You need only three ingredients to prepare 3-Ingredient Cheesy Sausage Squares:
- 1 pound (450 g) bulk pork breakfast sausage: Use mild or hot sausage depending on the amount of spice you prefer.
- 2 cups (8 ounces/225 g) shredded sharp cheddar cheese: Pack the cheese lightly when measuring.
- 1 can (8 ounces/235 g) refrigerated crescent roll dough or crescent dough sheet: Keep it refrigerated until you are ready to assemble the crust.
You will also need nonstick cooking spray or a light coating of grease for the pan. This is used only to prevent sticking and is not part of the filling.
Recipe Timing and Yield
- Preparation time: 15 minutes
- Sausage cooking time: 7–10 minutes
- Baking time: 18–22 minutes
- Resting time: 10 minutes
- Total time: Approximately 50–57 minutes
- Yield: 16 small squares
- Recommended pan: 8×8-inch baking pan
Ingredient Notes and Substitutions
Breakfast Sausage
Bulk pork breakfast sausage is ideal because it can be crumbled directly into the skillet. Mild sausage gives the squares a familiar breakfast flavor, while hot sausage adds noticeable heat.
Cook the sausage thoroughly before adding it to the dough. Ground pork sausage should reach a safe internal temperature of 160°F (71°C), as recommended by the USDA Food Safety and Inspection Service.
Turkey or chicken breakfast sausage can be substituted if desired, although this changes the original ingredient. Poultry sausage must reach 165°F (74°C). Choose bulk sausage rather than links, or remove the casings before cooking.
Sharp Cheddar Cheese
Sharp cheddar delivers plenty of flavor with a relatively short ingredient list. Medium cheddar can be used for a milder result, while extra-sharp cheddar creates a more pronounced cheese flavor.
For the smoothest melting, shred a block of cheddar at home. Pre-shredded cheese is convenient and will still work, but it often contains anti-caking ingredients that can make it melt a little less smoothly.
Avoid adding the cheese while the skillet is still over direct heat. Remove the cooked sausage from the burner first, then stir in the cheddar. The residual heat will begin melting the cheese without causing it to separate or become greasy.
Crescent Roll Dough
A seamless crescent dough sheet is the easiest option because it does not contain perforations. If you use regular crescent rolls, press the perforated seams together firmly before adding the filling.
Work with the dough while it is cold. Warm crescent dough becomes soft, sticky, and difficult to transfer. Leave the can in the refrigerator while you cook the sausage, then open it immediately before assembling the dish.
For this recipe, divide the dough crosswise into two equal pieces. Gently stretch each piece to fit the 8×8-inch pan. The layers will be relatively thin, so handle them carefully to avoid tearing.
How to Make 3-Ingredient Cheesy Sausage Squares
1. Preheat the Oven
Preheat the oven to 375°F (190°C).
Lightly grease an 8×8-inch baking pan or coat it thoroughly with nonstick cooking spray. Pay particular attention to the corners, where melted cheese can stick during baking.
A metal pan generally produces slightly crisper edges. A glass or ceramic dish can also be used, although the exact baking time may vary.
2. Cook the Breakfast Sausage
Place the bulk breakfast sausage in a large skillet over medium heat. Cook it for 7–10 minutes, breaking it into small crumbles with a wooden spoon or spatula.
Continue cooking until no raw areas remain and the sausage reaches 160°F (71°C) in the center of the largest pieces.
Smaller, evenly sized crumbles make the finished squares easier to cut and ensure that the filling is distributed consistently.
3. Drain the Sausage
Remove the skillet from the heat and carefully drain off the excess grease.
This step is especially important when using pork sausage. Too much rendered fat can soak into the bottom layer of crescent dough and prevent it from baking properly.
After draining, return the sausage to the warm skillet.
4. Add the Cheddar
Add the shredded sharp cheddar to the cooked sausage. Stir until the cheese is evenly distributed and begins to melt from the residual heat.
The mixture does not need to become completely smooth. It should simply hold together and contain cheese throughout.
Set the filling aside briefly while you prepare the dough.
5. Prepare the Bottom Crust
Open the crescent dough and carefully unroll it onto a clean work surface.
If using a seamless sheet, cut it crosswise into two equal rectangles. If using perforated crescent rolls, divide the dough evenly and press the perforations together to create two solid pieces.
Place one piece in the bottom of the prepared pan. Use your fingertips to stretch it gently toward the corners. Press any small tears closed, but avoid overworking the dough.
6. Add the Sausage Filling
Spoon the warm sausage-and-cheddar mixture over the bottom crust.
Spread it into an even layer, carrying the filling close to every edge and corner. An even layer helps the squares bake uniformly and ensures that each serving contains a similar amount of sausage and cheese.
Avoid pressing the filling down too firmly. A light, even layer allows the dough to puff around it.
7. Add the Top Crust
Place the remaining dough over the sausage mixture. Gently stretch it toward the edges until most of the filling is covered.
If the dough tears, pinch the opening closed with your fingers. The surface does not have to be perfectly smooth. Minor seams and ridges will become golden and attractive as the dough bakes.
8. Bake Until Golden
Bake for 18–22 minutes, or until the top crust is puffed and deep golden brown.
Check the center as well as the edges. If the edges are brown but the center still looks pale or doughy, continue baking for another 2–3 minutes while monitoring the pan closely.
The exact baking time can vary according to the pan material and oven calibration.
9. Rest Before Slicing
Remove the pan from the oven and place it on a heat-resistant surface. Let the bake rest for at least 10 minutes.
This short cooling time allows the melted cheese to thicken slightly and makes the squares much easier to cut. The filling will remain hot, so use care when serving.
10. Cut and Serve
Use a sharp knife to cut the bake into four rows in each direction, creating 16 small squares.
For larger breakfast portions, cut the pan into nine squares instead. Serve the squares warm for the best balance of flaky dough, melted cheddar, and savory sausage.
Tips and Tricks for Recipe Success
Drain the Sausage Thoroughly
Excess grease is the most common cause of a soft or oily bottom crust. After cooking, drain the sausage well. If it still looks particularly greasy, briefly place it on a paper towel-lined plate before mixing it with the cheese.
Keep the Dough Cold
Cold crescent dough is easier to unroll, stretch, and transfer. If it becomes too soft while you are working, return it to the refrigerator for several minutes.
Seal the Perforations
When using regular crescent rolls, pinch the seams together before placing the dough in the pan. Otherwise, the cheese mixture may push through the openings during baking.
Use Finely Crumbled Sausage
Large chunks make the top crust uneven and can cause the squares to fall apart when sliced. Break the sausage into small, consistent crumbles as it cooks.
Watch the Center of the Crust
The edges will usually brown first. Use the appearance of the center as the main indication that the dough is done. It should look puffed, dry, and golden rather than pale or glossy.
Allow Enough Resting Time
Cutting immediately may cause the hot cheese and sausage to slide out from between the crusts. Rest the pan for at least 10 minutes, or slightly longer if you want particularly neat portions.
Use the Correct Pan Size
An 8×8-inch pan is suitable for the specified quantities. If you want to use a 9×13-inch dish, you will need additional crescent dough to cover both the top and bottom adequately.
Recipe Variations
Although the original recipe needs only three ingredients, it is easy to adjust the flavor while keeping the same basic method.
Spicy Sausage Squares
Use hot pork breakfast sausage instead of mild sausage. This adds heat without requiring extra seasoning.
Extra-Sharp Cheddar Version
Replace sharp cheddar with extra-sharp cheddar for a stronger, tangier cheese flavor.
Mild and Creamy Version
Use mild breakfast sausage and medium cheddar. This combination is well suited to anyone who prefers less spice and a softer cheese flavor.
Turkey Sausage Squares
Bulk turkey breakfast sausage can replace the pork. Because turkey is generally leaner, there may be less grease to drain. Cook poultry sausage to 165°F (74°C).
Optional Additions
If you do not need to keep the recipe strictly limited to three ingredients, optional additions could include a small amount of diced jalapeño, chopped green onion, or freshly ground black pepper. Any added vegetables should be cooked or drained as needed so they do not release excess moisture into the crust.
How to Serve
Serve 3-Ingredient Cheesy Sausage Squares warm rather than piping hot. After the 10-minute resting period, the crust will still be crisp, the filling will remain pleasantly melted, and the portions will hold their shape more effectively.
For an appetizer or party tray, cut the bake into 16 small squares. Arrange them on a platter and provide small plates or napkins. Because the filling is enclosed between two layers of dough, the squares are easy to pick up and eat.
For breakfast or brunch, divide the pan into nine larger portions. Two small squares or one larger square generally makes a satisfying serving when paired with side dishes.
Serving Suggestions
These cheesy sausage squares pair well with both breakfast favorites and lighter accompaniments.
Consider serving them with:
- Scrambled or fried eggs
- A fresh fruit salad
- Sliced oranges, melon, or berries
- Crispy breakfast potatoes
- A simple green salad for brunch
- Tomato salsa or hot sauce
- Mustard for dipping
- Pickles or raw vegetables on an appetizer platter
For a larger brunch spread, place the sausage squares beside fresh fruit, eggs, muffins, and coffee. Their savory flavor creates a useful contrast to sweeter breakfast foods.
Make-Ahead Instructions
The sausage can be cooked up to one day in advance. Drain it, allow it to cool, and store it in a covered container in the refrigerator. When you are ready to bake, warm it briefly in a skillet before mixing in the cheddar. The warm sausage helps the cheese begin to melt and makes the filling easier to spread.
You may also assemble the entire dish several hours before baking. Cover the pan tightly and refrigerate it. Bake it directly from the refrigerator, adding a few minutes to the cooking time if necessary.
For the best crust texture, avoid assembling it too far in advance. The sausage filling can gradually soften the raw bottom layer if it sits overnight.
Storage and Reheating Instructions
Refrigerating Leftovers
Allow leftover squares to cool, then transfer them to an airtight container. Refrigerate them within two hours of baking.
Properly handled cooked leftovers can generally be kept in the refrigerator for 3–4 days, according to USDA leftover safety guidance.
Freezing
Place cooled squares in a single layer on a baking sheet and freeze until firm. Transfer them to a freezer-safe container, separating layers with parchment paper.
For the best texture and flavor, use the frozen squares within approximately two months. Thaw them overnight in the refrigerator before reheating.
Reheating in the Oven
Place the squares on a baking sheet and heat them at 350°F (175°C) for approximately 8–12 minutes, or until hot throughout. The oven or air fryer is the best option for restoring the crust’s crisp texture.
Reheating in the Air Fryer
Reheat at 325°F (165°C) for about 4–6 minutes. Check early because air fryers can vary in power.
Reheating in the Microwave
Microwave individual squares in short intervals until hot. This is the fastest option, but the crescent crust will be softer.
Reheated leftovers should reach 165°F (74°C) in the center.
Frequently Asked Questions
Can I make this recipe in a 9×13-inch pan?
Not with the listed quantity of crescent dough if you want both a top and bottom crust. One 8-ounce can works better in an 8×8-inch pan. To use a 9×13-inch dish, you would need more crescent dough and may need to adjust the baking time.
Can I use crescent roll triangles instead of a dough sheet?
Yes. Arrange the triangles into two roughly equal rectangles and pinch the perforations firmly together. Press one rectangle into the bottom of the pan and use the other for the top.
Why is the bottom crust soggy?
The sausage may not have been drained thoroughly, or the filling may have sat on the raw dough for too long before baking. A pale bottom crust can also result from removing the dish from the oven before the center has fully baked.
Can I use pre-shredded cheddar?
Yes. Pre-shredded cheddar is convenient and works in this recipe. Cheese grated directly from a block usually melts more smoothly, but either option is acceptable.
How do I know when the sausage is fully cooked?
Cook until it is evenly browned, no raw areas remain, and a food thermometer reads at least 160°F (71°C) for pork sausage. Do not rely on color alone when confirming doneness.
Can I serve these at room temperature?
They can sit out briefly during a meal or gathering, but foods containing cooked meat and cheese should not remain at room temperature for more than two hours. Refrigerate any leftovers promptly.
Why should the pan rest before slicing?
The cheese is very loose when it first comes out of the oven. Resting allows the filling to settle and the crust to firm slightly, producing cleaner squares.
Can I prepare only the filling ahead of time?
Yes. Cook and drain the sausage, cool it promptly, and refrigerate it for up to one day. Rewarm it before adding the cheese and assembling the dish.
Final Conclusion
These 3-Ingredient Cheesy Sausage Squares turn three familiar ingredients into a savory, easy-to-portion dish suitable for breakfast, brunch, parties, and casual gatherings. Thoroughly draining the sausage, keeping the crescent dough cold, and allowing the finished bake to rest are the keys to crisp crusts and clean slices.
Using an 8×8-inch pan ensures that one can of crescent dough can form both layers. Serve the squares warm, accompany them with fruit or eggs for breakfast, or cut them into small portions for a simple appetizer everyone can pick up and enjoy.