Introduction
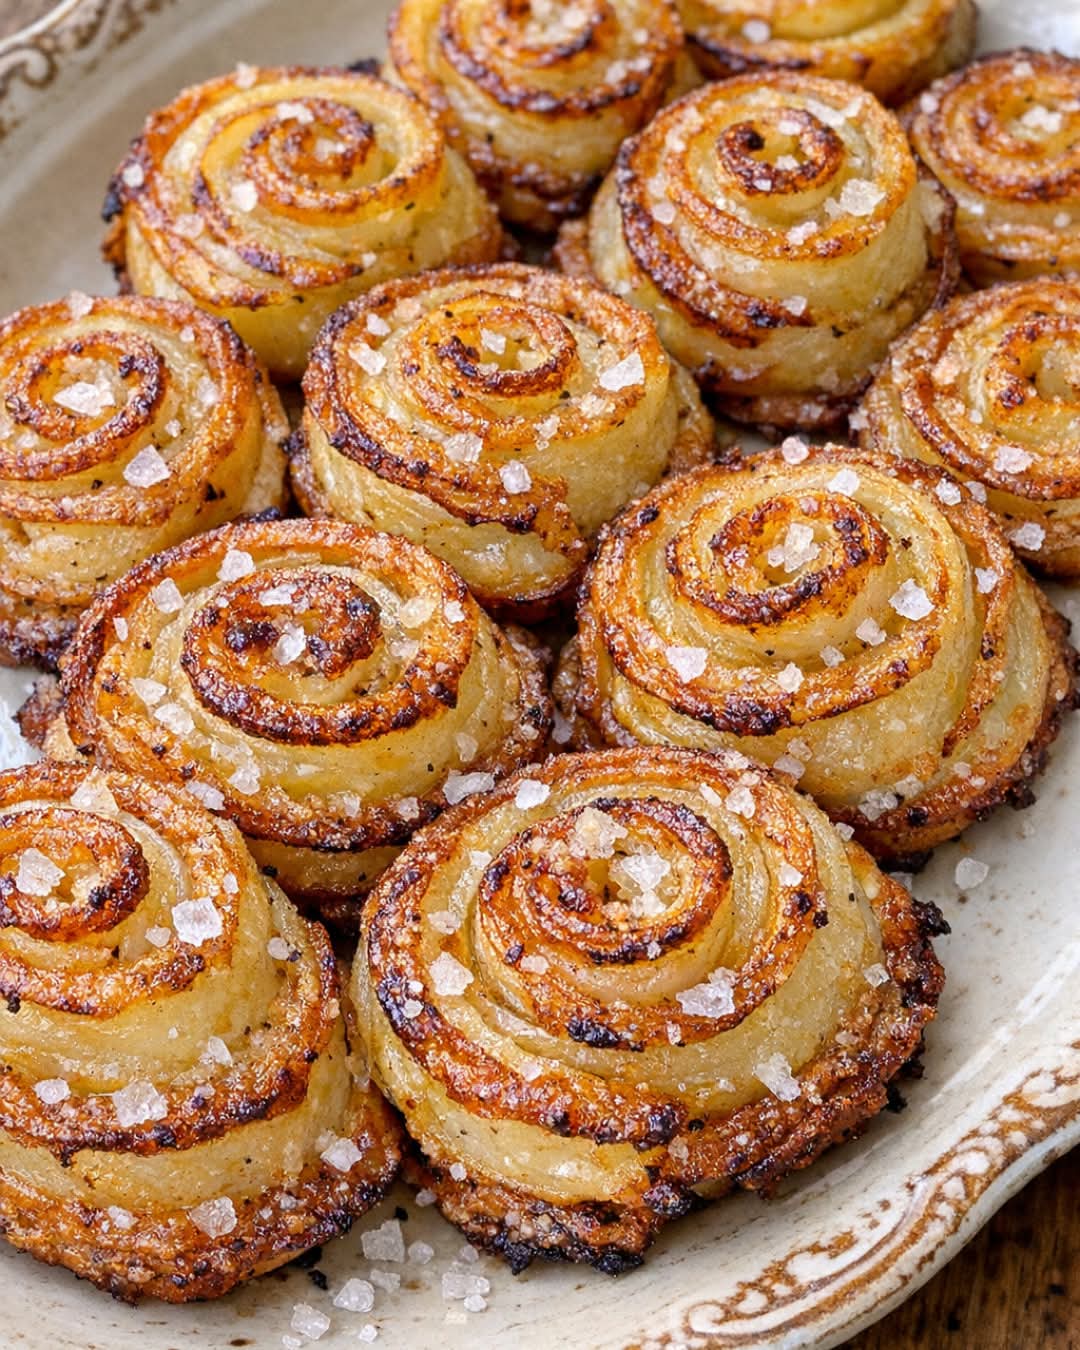
Oven Baked 3-Ingredients Crispy Potato Pinwheels transform three basic ingredients into golden, rose-shaped potato bites with crisp edges and tender centers. Thin slices of russet potato are overlapped, rolled into spirals, brushed with olive oil, and baked until deeply golden.
Although the finished pinwheels look decorative, the recipe uses only potatoes, olive oil, and flaky sea salt. The key is slicing the potatoes evenly and thinly enough that they can bend without breaking. A mandoline makes this faster, but a sharp knife also works when used carefully.
These crispy potato roses can be served as an appetizer, snack, or side dish. Their individual size makes them convenient for dinner parties, holiday meals, brunches, and casual gatherings.
Why This Recipe Works
This simple method creates an appealing combination of textures and flavors.
- Russet potatoes become crisp: Their starchy texture helps the exposed edges brown while the overlapping centers remain tender.
- Thin slices are flexible: Very thin potato slices can be rolled into tight spirals without snapping.
- Olive oil encourages browning: Coating the slices lightly helps them roast instead of drying out.
- A muffin pan supports the shape: Placing each spiral in a muffin cup prevents it from unrolling while it bakes.
- Flaky salt adds texture: A small amount of flaky sea salt provides seasoning and a light crunch.
- Only three ingredients are required: The recipe does not depend on cheese, dough, or complicated seasonings.
The roses may look intricate, but they are made by repeating the same straightforward rolling technique.
Ingredients You’ll Need
| Ingredient | Quantity |
|---|---|
| Large russet potatoes | 2 |
| Olive oil | 2 tablespoons |
| Flaky sea salt | 1 teaspoon, plus more to taste |
You will also need a sharp knife or mandoline slicer, a cutting board, a pastry brush, and preferably a standard muffin pan. A baking sheet lined with parchment paper can be used, but a muffin pan holds the spirals more securely.
Ingredient Notes and Substitutions
Russet Potatoes
Large russet potatoes are ideal because their starchy flesh develops crisp, browned edges in the oven. Choose firm potatoes without green areas, sprouts, deep cuts, or soft spots.
Try to select potatoes with a similar width. Evenly sized slices make the pinwheels easier to assemble and help them cook at approximately the same rate.
Yukon Gold potatoes may be substituted. They have a creamier texture and slightly richer flavor, but their edges may not become quite as crisp as russet potatoes.
Olive Oil
Olive oil helps the potato slices brown and prevents the exposed edges from becoming dry. Regular or extra-virgin olive oil can be used.
Avocado oil or another neutral cooking oil is a suitable substitution. Regardless of the oil selected, use only enough to coat the slices lightly. Excess oil can collect at the bottom of the muffin cups and make the pinwheels greasy.
Flaky Sea Salt
Flaky sea salt provides visible crystals and a pleasant finishing texture. Use some before baking and reserve a small amount for the hot pinwheels after they come out of the oven.
Kosher salt can be substituted, but begin with less because the size and density of salt crystals vary. Fine table salt is more concentrated by volume and should also be used sparingly.
How to Make Oven Baked 3-Ingredients Crispy Potato Pinwheels
Step 1: Prepare the Oven and Pan
Preheat the oven to 425°F (220°C). Lightly brush the cups of a standard muffin pan with a small amount of the measured olive oil.
The muffin pan is the most reliable way to create the upright, rose-shaped pinwheels shown in the photo. If using a baking sheet instead, line it with parchment paper and place each pinwheel seam-side down. The spirals may spread slightly more on a flat pan.
Step 2: Wash and Dry the Potatoes
Scrub the potatoes thoroughly under cool running water. Pat them completely dry with a clean kitchen towel.
The potatoes do not need to be peeled. Leaving the skin on adds color around some of the edges and helps reduce preparation time. If a smoother appearance is preferred, peel them before slicing.
Step 3: Slice the Potatoes Thinly
Using a mandoline or sharp knife, cut the potatoes crosswise into rounds about 1/16 inch thick. Consistent thickness is important: slices that are too thick may crack when rolled, while paper-thin slices can burn before the centers become tender.
Use the mandoline’s hand guard and keep your fingers away from the blade. Stop slicing when the remaining piece becomes too small to hold safely.
Work promptly after cutting the potatoes. Soaking is not recommended for this recipe because the natural surface starch helps the overlapping pieces hold together.
Step 4: Coat the Potato Slices
Place the slices in a large bowl. Add most of the olive oil, reserving a little for the pan and exposed edges. Gently turn the slices with clean hands until both sides are lightly coated.
Sprinkle with most of the flaky salt and toss carefully. Separating the slices as you coat them ensures that the oil reaches more of the surfaces.
Step 5: Form the Pinwheels
For the rose-shaped appearance, cut the potato rounds in half. Arrange approximately 8 to 12 half-slices in a straight row, with the flat cut edges aligned along the bottom. Overlap each piece by about half, leaving the rounded edges exposed along the top.
Starting at one end, roll the row into a tight spiral. The curved potato edges will resemble rose petals.
Place the rolled spiral upright in a prepared muffin cup. If it looks too loose, add one or two potato slices around the outside. If it is too large for the cup, remove an outer slice rather than forcing it into place.
Repeat with the remaining potatoes. Two large potatoes should produce approximately 8 to 10 pinwheels, depending on their size and the number of slices used in each one.
Step 6: Oil and Season the Tops
Brush the exposed tops and edges with the remaining olive oil. Pay particular attention to the thin outer edges because they will brown and crisp first.
Sprinkle the pinwheels evenly with the remaining salt, reserving a small pinch if you want to finish them after baking.
Step 7: Bake Until Golden
Bake for 25 to 35 minutes. Rotate the pan after approximately 20 minutes if your oven browns unevenly.
Begin checking early. The pinwheels are ready when the outer edges are deep golden brown and crisp and the centers are tender when pierced with the tip of a small knife.
If the edges are browning before the centers become tender, loosely cover the pan with foil and continue baking for a few more minutes. Baking time will vary depending on slice thickness and the size of the spirals.
Step 8: Rest and Serve
Let the pinwheels rest in the pan for 3 to 5 minutes. Carefully loosen the edges with a thin knife or small offset spatula, then lift each spiral onto a serving plate.
Finish with an optional extra pinch of flaky sea salt and serve while warm and crisp.
Tips and Tricks for Recipe Success
Keep the Slices Uniform
Even slices are more important than extremely thin ones. A mixture of thick and thin pieces leads to uneven cooking: some edges may burn while thicker sections remain firm.
Make the Slices Flexible
If the potato slices crack while rolling, they are probably too thick. Slice them more thinly or allow the oiled slices to sit for about five minutes. The oil and salt will soften them slightly and make them easier to bend.
Do Not Rinse Away the Starch
Rinsing and soaking are useful for some crispy potato recipes, but not for these pinwheels. The starch helps neighboring slices cling together and maintain the spiral shape.
Use the Right Amount of Oil
Every slice should have a thin coating, but the potatoes should not be dripping. Too little oil can produce dry edges, while too much can make the bottoms heavy and greasy.
Roll the Spirals Tightly
A compact roll holds its shape better during baking. The slices will relax slightly as they cook, so begin with a firm spiral.
Avoid Overfilling the Muffin Cups
The pinwheels need enough room for heat to circulate around their exposed edges. If a roll is too large, divide it into two smaller portions.
Watch the Final Minutes Closely
The difference between golden and burned edges can be only a few minutes. Check the potatoes frequently toward the end, especially when using dark-colored metal bakeware.
Recipe Variations
The original Oven Baked 3-Ingredients Crispy Potato Pinwheels require only the three listed ingredients. All additions below are optional.
Garlic Potato Pinwheels
Add optional garlic powder to the oil before coating the potato slices. Powder works better than fresh minced garlic, which can burn on the exposed edges.
Herb-Seasoned Pinwheels
Sprinkle the slices with optional dried rosemary, thyme, Italian seasoning, or chives before rolling them.
Smoky Potato Roses
Add a small amount of optional smoked paprika with the salt. This gives the potatoes a warm color and smoky flavor without changing the assembly method.
Parmesan Potato Pinwheels
Sprinkle optional finely grated Parmesan over the pinwheels during the final 10 minutes of baking. Adding it near the end reduces the chance of the cheese becoming too dark.
Spicy Pinwheels
Add optional cayenne pepper, crushed red pepper, or chili powder. Start with a small quantity so the seasoning does not overpower the potatoes.
Sweet Potato Pinwheels
Sweet potatoes may be used instead of russets. Because their texture and sugar content are different, watch them carefully and expect slightly softer centers and faster browning.
How to Serve
Serve the pinwheels warm, when their edges are at their crispiest. Arrange them upright on a platter so their spiral pattern remains visible.
They work well as an appetizer, but they can also replace ordinary roasted potatoes at dinner. For a seated meal, allow one or two pinwheels per person, depending on their size and the other dishes being served.
Use a small fork when serving them as a side dish. Although the outer layers are crisp, the centers remain tender and may separate when bitten.
Serving Suggestions
These crispy potato pinwheels pair well with roasted or grilled main dishes, including:
- Roast chicken
- Grilled steak
- Baked fish
- Burgers
- Meatloaf
- Roasted vegetables
- Green salads
- Scrambled eggs or omelets
Optional dipping sauces can turn them into a party appetizer. Suitable choices include sour cream, ranch dressing, garlic aioli, ketchup, spicy mayonnaise, or cheese sauce.
Serve dips on the side rather than spooning them over the potatoes. This preserves the crisp edges and keeps the rose pattern visible.
Make-Ahead Instructions
For the best color and texture, slice and assemble the potatoes shortly before baking. Raw cut potatoes can darken when exposed to air, and refrigerating the assembled spirals may dry out their edges.
If a short head start is necessary, assemble the pinwheels up to one hour before baking. Place them in the prepared muffin pan, cover the pan tightly, and refrigerate. Brush the exposed edges with oil immediately before placing them in the oven.
The potatoes may require a few additional minutes of baking when they go into the oven cold.
For longer advance preparation, bake the pinwheels completely and reheat them just before serving. They will still be flavorful, although freshly baked pinwheels provide the crispiest result.
Storage and Reheating Instructions
Refrigerating
Allow leftover pinwheels to cool, then place them in an airtight container. Refrigerate for up to three to four days.
Avoid packing them tightly while they are still warm. Trapped steam will soften the crisp edges.
Reheating in the Oven
Arrange the pinwheels upright on a baking sheet or return them to a muffin pan. Reheat at 400°F (205°C) for 8 to 12 minutes, or until hot and crisp around the edges.
Reheating in an Air Fryer
Place the pinwheels in a single layer and reheat at 375°F (190°C) for approximately 4 to 6 minutes. Check frequently because the thin edges can darken quickly.
Reheating in the Microwave
Microwaving is possible, but it will soften the potato edges. Use the oven or air fryer when restoring crispness is important.
Freezing
Freezing is not recommended for the best texture. Cooked potatoes can become softer or slightly grainy after freezing and thawing. If necessary, freeze the baked pinwheels in an airtight container and reheat them directly from frozen in the oven.
Frequently Asked Questions
Do I need a mandoline slicer?
No, but a mandoline produces thin, consistent slices quickly. A sharp chef’s knife works as long as the rounds are cut as evenly as possible.
Should I peel the potatoes?
Peeling is optional. The skin is edible after thorough scrubbing and can add color to the finished pinwheels.
Why are my potato slices breaking?
The slices are probably too thick. Cut them about 1/16 inch thick and coat them with olive oil before rolling. Letting the coated slices rest briefly can also improve flexibility.
Why did my pinwheels unroll?
The slices may not have overlapped enough, or the spiral may have been rolled too loosely. A muffin pan provides support and is more reliable than a flat baking sheet.
How can I tell when the centers are cooked?
Insert the tip of a thin knife into the center of one pinwheel. It should slide through the potato with little resistance. The outside should be golden, but color alone does not guarantee that the center is tender.
Can I bake the pinwheels on a baking sheet?
Yes, but place them seam-side down and leave space between them. They may spread and become flatter than pinwheels baked in muffin cups.
Why aren’t the edges crispy?
The potatoes may have been sliced too thickly, coated with too much oil, or placed too close together. Continue baking for a few minutes while watching the edges carefully.
How many pinwheels does this recipe make?
Two large russet potatoes should make approximately 8 to 10 pinwheels. The exact yield depends on potato size and how many slices are used in each spiral.
Final Conclusion
Oven Baked 3-Ingredients Crispy Potato Pinwheels offer a decorative way to serve ordinary roasted potatoes without requiring a long ingredient list. Thinly sliced russets, olive oil, and flaky salt create spirals with browned edges, tender centers, and a simple savory flavor.
Uniform slicing, tight rolling, and support from a muffin pan are the main factors behind successful potato roses. Serve them hot as a party appetizer, brunch addition, or eye-catching side dish with your favorite main course.