KFC’s Original Secret Chicken Recipe – The Ultimate Homemade Version
There’s something undeniably irresistible about crispy fried chicken. That golden crust, the juicy meat inside, and the unmistakable blend of herbs and spices make it one of the most beloved comfort foods in the world.
Inspired by the iconic flavor of , this homemade version of the famous “secret recipe” lets you recreate that crave-worthy experience right in your own kitchen.
Whether you’re cooking for family dinner, a weekend gathering, or simply satisfying a craving, this recipe delivers that nostalgic, takeout-style taste without leaving your home.
The beauty of this dish lies in its balance—crispy, seasoned coating on the outside and tender, juicy chicken on the inside. And the best part? You control every ingredient, ensuring freshness and quality.
This recipe doesn’t claim to be the exact original (that famous formula is still locked away!), but it comes incredibly close. With a carefully crafted mix of spices and a simple cooking technique, you’ll be amazed at how authentic it tastes.
Let’s dive into what makes this recipe so special and how you can master it step by step.
Why This Recipe Works
The magic of this fried chicken lies in its layered flavors and technique. Each step is designed to maximize taste and texture, giving you that signature crunch and juicy bite.
First, the coating mixture is packed with herbs and spices like paprika, oregano, thyme, and garlic powder. These ingredients work together to create a deep, savory flavor that penetrates every bite. Grinding the mixture finely ensures even distribution, so no piece is under-seasoned.
Second, the egg coating acts as a binding agent. It helps the flour mixture stick perfectly to the chicken, forming that classic crispy crust when fried.
Another key factor is cooking temperature. Frying at a controlled heat allows the chicken to cook through without burning the outside. Starting uncovered and finishing covered ensures a crispy exterior and fully cooked interior.
Finally, resting the chicken on paper towels removes excess oil while preserving the crunch. This simple step makes a big difference in texture.
What You’ll Need For This Recipe
To achieve the best results, you’ll need a mix of simple pantry staples and fresh ingredients.
Main Ingredients:
1 whole chicken, cut into pieces
3 eggs, whisked
4 tablespoons oil (for frying)
For the Coating:
2 cups flour
4 teaspoons paprika
1 teaspoon salt
1 teaspoon black pepper
1 teaspoon poultry seasoning or chicken stock powder
1 teaspoon oregano
1 teaspoon tarragon
1 teaspoon parsley
½ teaspoon thyme
1 teaspoon chopped green onions
½ teaspoon garlic powder
½ teaspoon onion powder
½ teaspoon celery salt
These ingredients come together to create that bold, savory flavor profile that makes fried chicken so addictive.
How To Prepare the Chicken Properly
Before you even start cooking, preparation is key. Begin by cleaning and patting the chicken pieces dry. Removing excess moisture helps the coating stick better and improves crispiness.
If you want to elevate the flavor, consider seasoning the chicken lightly with salt and pepper before dipping it into the egg mixture. This adds an extra layer of taste from the inside out.
For even better results, you can marinate the chicken in buttermilk for a few hours or overnight. This tenderizes the meat and gives it a subtle tangy flavor.
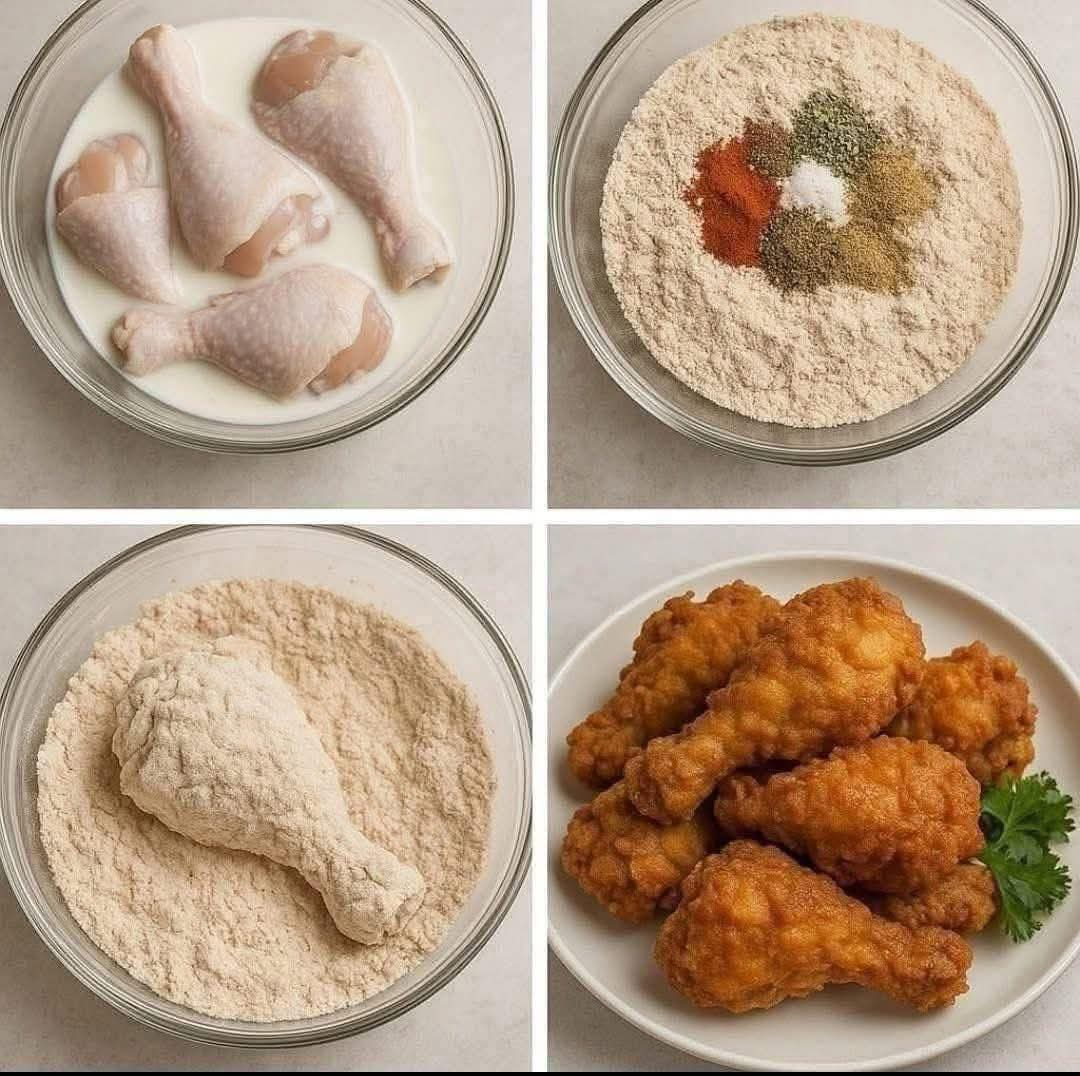
How To Make This Recipe Step by Step
Start by preparing the coating. Sift the flour into a bowl and mix in all the herbs and spices. Use a mortar and pestle to grind the mixture finely, then transfer it into a clean plastic bag.
Next, dip each piece of chicken into the whisked eggs, ensuring it is fully coated. Place the chicken into the bag with the flour mixture and shake well until every piece is evenly covered.
Heat the oil in a frying pan over medium-low heat. Carefully place the coated chicken pieces into the pan without overcrowding.
Cook the chicken uncovered at first, allowing the crust to develop and turn golden brown. Once browned, cover the pan and continue cooking on low heat until the chicken is fully cooked through.
Remove the chicken and place it on paper towels to drain excess oil.
The Secret to the Perfect Crispy Coating
Achieving that perfect crunch is all about technique. The key is ensuring the coating adheres properly and fries evenly.
Using a plastic bag for coating helps distribute the flour mixture evenly. It also creates a slightly thicker crust, which enhances crispiness.
Another trick is double-coating. After the first coating, dip the chicken back into the egg and then into the flour again for an extra crunchy layer.
Finally, maintaining the right oil temperature is crucial. Too hot, and the coating burns. Too cool, and the chicken becomes greasy.
Tips + Tricks & More For Recipe Success
Perfect fried chicken requires attention to detail. Here are some essential tips:
Keep the oil temperature around 175°C (350°F)
Fry in batches to avoid overcrowding
Let the chicken rest after frying
Use a thermometer to ensure internal temperature reaches 75°C (165°F)
Adjust spices to suit your taste
Small tweaks can make a big difference in flavor and texture.
Flavor Variations You Can Try
One of the best things about this recipe is its versatility.
You can create a spicy version by adding cayenne pepper or hot sauce. For a tangy twist, try a buttermilk marinade. Want extra crunch? Add crushed cornflakes or panko breadcrumbs.
You can even experiment with herbs like basil or dill for a unique flavor profile. For a sweet and savory twist, drizzle honey over the finished chicken.
Healthier Oven-Baked Option
If you prefer a lighter version, you can bake the chicken instead of frying.
Preheat your oven to 200°C (400°F). Place the coated chicken on a baking tray lined with parchment paper and bake for 30–40 minutes.
While it won’t be exactly the same as fried chicken, it still delivers a delicious, crispy result with less oil.
How To Serve This Fried Chicken
This chicken is incredibly versatile and can be served in many ways.
You can enjoy it hot and fresh straight from the pan, or pair it with classic sides like fries, coleslaw, or mashed potatoes. It also works perfectly in sandwiches or wraps.
Serving it with dipping sauces like ranch, honey mustard, or spicy mayo adds even more flavor.
Serving Suggestions for Every Occasion
For a casual meal, serve it with simple sides and drinks. For gatherings, create a fried chicken platter with multiple sauces and sides.
It’s also great for picnics, family dinners, or even special occasions when you want something comforting and satisfying.
How To Store Leftovers Properly
If you have leftovers, proper storage is essential.
Let the chicken cool completely before storing. Place it in an airtight container or wrap it tightly. Refrigerate for up to 3–4 days.
For longer storage, freeze the chicken for up to 2–3 months.
How To Reheat Without Losing Crispiness
Reheating fried chicken can be tricky, but the oven is your best friend.
Preheat your oven to 175°C (350°F) and heat the chicken for 15–20 minutes. This helps restore the crispiness without drying out the meat.
Avoid microwaving if possible, as it can make the coating soggy.
Common Mistakes to Avoid
Even simple recipes can go wrong if you’re not careful.
Avoid using oil that’s too hot or too cold. Don’t skip seasoning the chicken itself. And never overcrowd the pan, as it lowers the oil temperature and affects cooking.
Paying attention to these details ensures consistent results every time.
Time, Yield, and Final Thoughts
Prep Time: 20 minutes
Cook Time: 30–40 minutes
Total Time: 1 h
Servings: 4–6
This homemade version of -style fried chicken proves that you don’t need takeout to enjoy incredible flavor. With the right ingredients and techniques, you can recreate that iconic crispy, juicy chicken in your own kitchen.
Once you try it, you might never go back to store-bought again.